How Azure Virtual Desktop Works in Hybrid Environment
Today we will understand what Azure Managed VDI service – Azure Virtual Desktop (AVD) offer and how to set it up.
It is PaaS based VDI service available to users working from home or office. This service available in the selective regions as of now. It supports dedicated and multi-users sessions on Windows 10 and 11 OS. As part of bundle, you can get Office 365 features. These are well integrated and managed by M365 product. VDIs are available with windows server latest OS. It is scalable service through which you deploy virtual desktops and Apps.
If you look into AVD components, it is not very new. Your IT team had been implemented to provide remote desktops to you in the past. This time it is bundled as managed service so your IT team does not need to setup, admin or manage. It consists of Web Access, gateway, connection broker, Load balancers and SQL DB.
From management perspective, you have to create subscription, create AVD service , setup AD and session host. You can bring your own image as well.
With this service, you can increase profit margin and provide best service to customer when they want to migrate from on-premise to Azure cloud.
From security point of you, you keep web session URL behind Firewall or Proxy so customer can access his VDI or apps from anywhere without worry.
In AVD service, you create host pool. It is group of one or more VMs of same configuration. You can create multiple host pools based on your need. Separate pool for tester, developer, Data analyst or data engineer like wise. Host pool provide you two load balancing options, Breadth first and Depth first.
In breadth first, user sessions are equally distributed on VDIs to get best experience to customers. If you go with Depth-first, all allowed users session (concurrent) will be occupied on one VDI to reach available sessions limit before moving to next VDI. This option will be useful from cost saving perspective.
As a first step, you can plan and setup identity. In case of hybrid connectivity, you can sync-up your on-premise AD with Azure AD. Detailed steps provided in my blog, https://multicloudsagar.com/hybrid-identity-in-azure/
If it is new setup, you can setup windows AD on Azure VM or create ADDS ( managed AD service).
Let’s understand user flow before jumping to demo.
- User opens RD client, login with ad credentials
- After successful authentication, RD client connect to web access, connection broker queries in DB to check VDI allocated to user
- VDI appears to user. Click on it to connect to gateway
- Broker orchestrates connection from host agent to gateway.
- RDP traffic now flows between RD Client and session host over websocket on port 443.
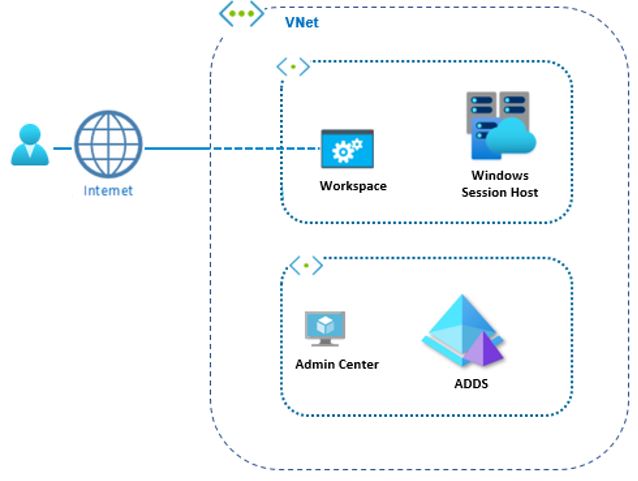
Architecture Diagram
High Level Steps to on-board Azure Virtual Desktop
- Setup Azure ADDS Service
- Create users
- Create Host Pool
- Set VM configuration
- Add Workspace
- Enable Diagnostic Setting
- Create Application group
- Test Workspace
Deployment Steps
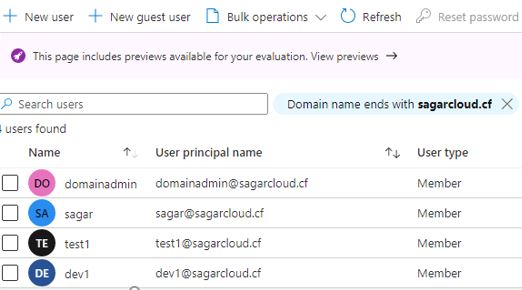
- I have setup ADDS Service with spcloud.cf domain. If you want to understand how to setup ADDS service, refer my blog, https://multicloudsagar.com/adds/

2. Create users in spcloud.cf domain. We will provide access to these users for login on AVD.
3. Search for Azure Virtual Desktop service in Azure Portal, click on Create host Pool. In this step, you will select subscription, use existing resource group or create new one. Provide name to host pool. Select region. You will see this service still available in the limited regions. Select app group as desktop. If you want to host remote app, select Remote App (RAIL). Under Host Pool type, select personal for dedicated session or select pooled for concurrent session requirement. I have selected pooled as host pool type. Selected Breadth-first as load balancing type and set maximum session is 3.

4. On next screen, Set VM configuration. Select resource group. Provide prefix. Select Virtual machine location. Choose availability group. Select OS image and SKU from drop-down. Mention VM count and disk type. Enable Boot diagnostic setting to store logs in Storage account for troubleshooting. Create Virtual machine and workspace later. Click on review and create. Select network, allow public inbound ports. Put ADDS details for VM domain join. You need domain administrator permission to add machine to domain. You can get option to put VM in respective OU. Add local user name and password.
5. Add Workspace name to register app.
6. Enable Diagnostic to configure streaming export of platform logs and metrics for a resource to the destination setting for Host pool.
7. Create Application group under Host pool. Select Subscription, resource and host pool. Choose Application group as Desktop. Assign access permission to Azure AD users or groups. Select workspace. Click on review and create application group. You will see Host pool readiness.

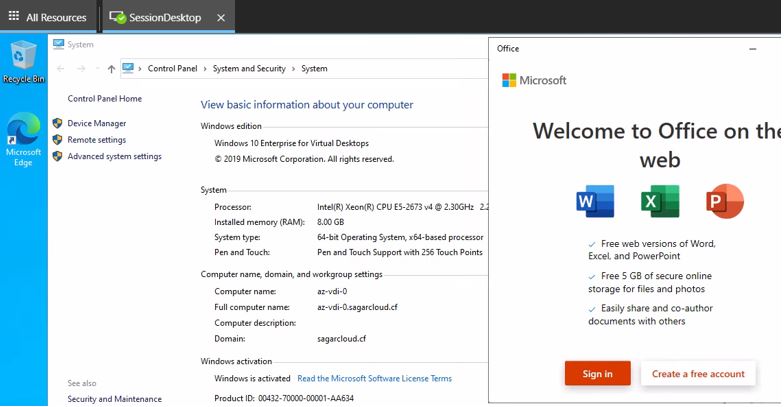
8. Test Virtual Desktop

In this article, I have given insight of AVD service and how you can enable this service for your orgnization.
Keep Reading my articles and learn new things.