Launching Cloud PC with Windows 365
Windows 365 is SaaS based service which provides Cloud PC. It is nothing but dedicated virtual machine to individual user. It is highly available and scalable device.
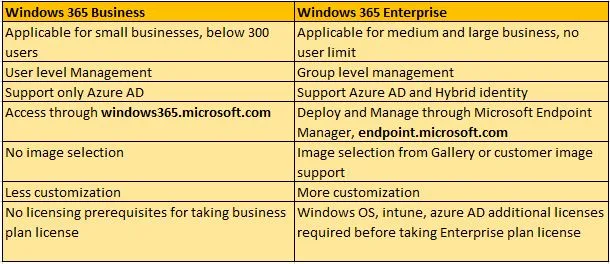
User can access Cloud PC from Laptop/Desktop/Mobile/Tab. You will get windows 10 and 11 OS inbuilt with it as offering. Windows 365 comes with business and enterprise plans.
Below is high level difference.
How Cloud PC different from Azure Virtual Desktop (AVD)
- Cloud PC is limited to dedicated windows 10 and 11 OS session whereas AVD supports single or multi-sessions windows 10, 11 and server edition
- Cloud PC runs on SaaS model where user get license to access it. AVD works on PaaS model where you can change configuration and management
- Pricing in Cloud PC per user per month basis. AVD works on consumption based mode
- End user has dedicated session in Cloud PC. You can provision single desktop, shared desktop or remote apps in AVD
- Cloud PC support Azure AD and Hybrid AD. AVD does not support Azure AD. Only work in windows AD or ADDS (Azure Directory Domain Service)
Setting up Windows 365 Business
Login into Microsoft 365 Admin Center (https://admin.microsoft.com/). Go to Billing -> purchase service. search for windows 365. Select windows 365 Business plan. For the demo, I am going with free trial which allow me 1 license to use. You can see your product under Billing -> your product section. If you purchase business plan, then you can opt for Cloud PC sizing based on vCPU, RAM and Storage. You can go upto 8vCPU, 32 GB RAM and 512 GB Storage as maximum limit.
Go to user -> active users. Create user. assign windows 365 license and set the password.
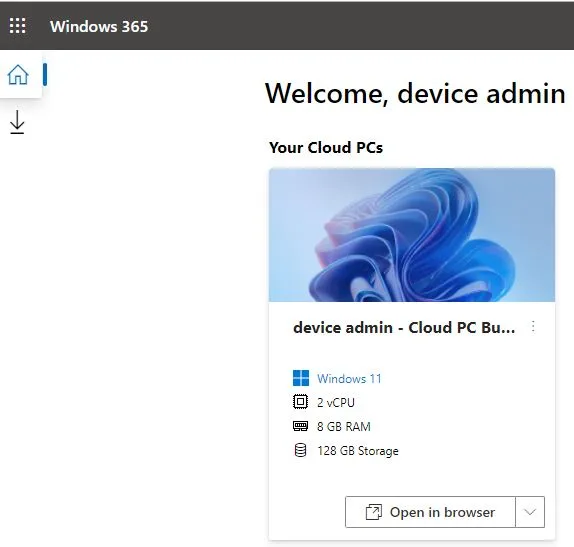
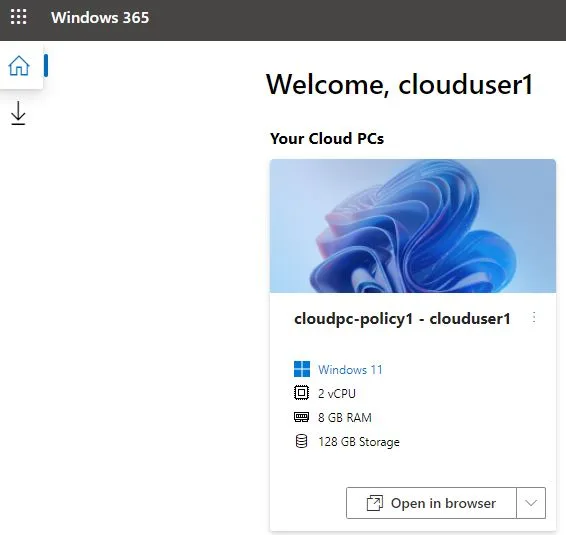
login into Windows 365 Portal (https://windows365.microsoft.com/) with license assigned user. you will see below screen. Cloud PC will be provisioned automatically and available to use.
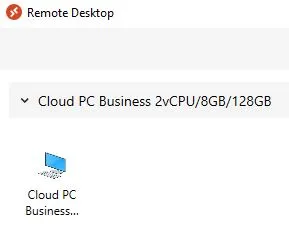
You can access the cloud PC via web browser or remote desktop client. Download and install the client. Installation is straight forward. When you run it, it will ask you to subscribe or subscribe URL to access cloud PC. If you want to install any app, you can download from Microsoft store app. By-default you will get Microsoft 365 apps, Microsoft teams and Microsoft OneDrive.
To modify default setting, login into windows 365 portal with admin user having Global Administrator or Windows 365 Administrator permission. You can modify account type (standard/local), operating system (windows 10/11), Language and region. As admin, you can reset password, block sign-in and delete the user.
You can enroll new cloud PC in Microsoft Endpoint Manager (Microsoft Intune) if you have intune license or Microsoft 365 with Intune bundled License.
If you have more users, then you will have to purchase those number of license with SKU sizing based on use cases. You can un-assign user’s license if user does not need it or leave organization.
Setting up Windows 365 Enterprise
To Start with Windows 365 Enterprise, you need licenses of windows 11 or 10 enterprise, Intune, azure active directory P1. Or else you can take Microsoft 365 E3 or E5 license. It is bundled license. For the demo, I have taken free trial licenses as shown below. You can login into Microsoft 365 Admin Center (https://admin.microsoft.com/) , you can take license from purchase section. Go to Purchase and search for required licenses, set SKU and do checkout.

I have created few Azure AD Users and assign above licenses to access Cloud PC. There are multiple ways to create it. You can create via Microsoft Azure portal, Microsoft 365 admin center or Microsoft Intune Admin center. In windows 365 business section, I have created user from Microsoft admin center. You can use same portal to do the same. In Enterprise, you have to assign Microsoft 365 E5 and windows 365 enterprise license to user.
Same with user, there are three ways to create Azure AD Security Group, You can create via Azure portal, Microsoft 365 admin center or Microsoft Intune Admin center. Login into Microsoft Intune Admin Center (https://endpoint.microsoft.com/). Go to Group -> New Group. Select security group and provide name. Add member who has valid licenses. Keep remaining setting as default. Review and create it.
You can create provisioning policy for Cloud PC in two ways
- Microsoft hosted network -with Azure AD.
- Customer hosted network with Azure AD join or Hybrid AD (On-premise AD synced with Azure AD)
Cloud PC lifecycle contains 4 major categories, Provision, Configure, Protect and Monitor. Scope of the blog is to cover these categories.
Login into Microsoft Intune Admin Center. Go to Device -> Provisioning -> Windows 365. Under All Cloud PCs, you will find user with not provisioned status. To update it, you have to create provisioning policy first. Click on create provisioning policy, provide name, select joint type as Azure AD join. Other option is to go with Hybrid Azure AD join. I am selecting Microsoft Hosted Network (MHN). After selecting this, you have to set geography and region. In my case, geography is India and region selection can be automatic or Manual. Both options are ok.
You can select image from gallery. If you have custom image, you can provide that as well. To get custom image, you have to import image from Azure subscription and keep it ready. I have selected gallery image windows 11 enterprise + Microsoft 365 apps, English (united states) as language and region under configuration.
Select the Azure AD Security Group containing users who have Windows 365 licenses, will allocate Cloud PC to them. The provisioning policy will be assigned on this group. Review and create it. After creating it, you will get status as provisioned under All Cloud PCs.

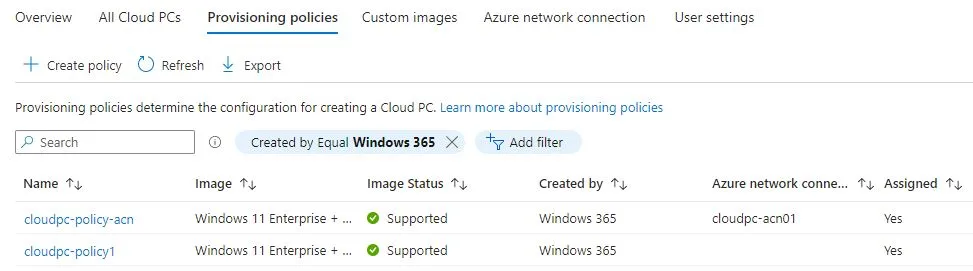
While creating provisioning policy with Azure Network Connection (bring your own network), you have to create Azure network connection (ACN) first. You need to provide subscription, resource group, VNET and subnet for creating it. Azure Network Connection support Azure AD and Hybrid Azure AD both. i have created both policies as below.
If you want to make restore points of cloud PC and restore it, you can configure user setting. Use Setting can be applied on Azure AD Security Group. You can see Cloud PC details under Device -> Windows.
To access this Cloud PC, you can login with user who has valid licenses on Windows 365 Portal (https://windows365.microsoft.com/), you will find Cloud PC published with provisioning policy.
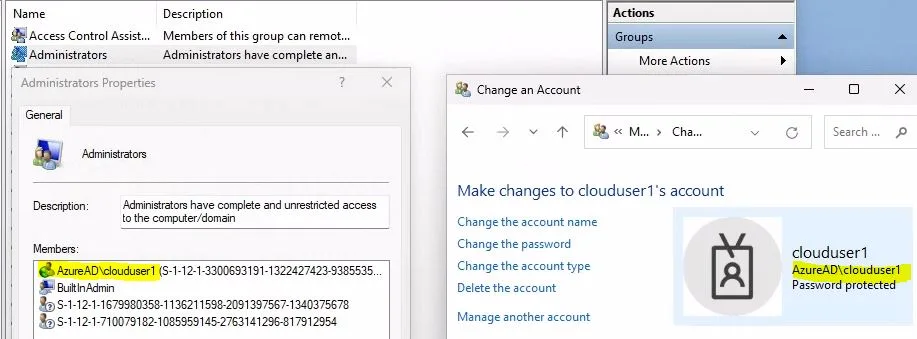
You can access it via browser that ask Azure AD User credentials for login. Other option is that you can download remote desktop client tool and subscribe it. If you check User credential, you will come to know, Cloud PC has joined to Azure AD as shown below.
Microsoft Intune validate Cloud PC are compliant or not with Device Compliance Policy. To create it, go to endpoint security –> Device Compliance. It will be applied on enrolled device. Create policy, select platform from drop-down, provide name, set compliance setting against that you will validate. Set action against non-compliance status. Assign this policy to users, groups or devices.
Next option is secure Cloud PC with Security Baseline. You will find default security baseline under Endpoint Security -> Security baselines. You can click and create profile. Check configuration settings and modify if required. Scope can be default. In Assignment, assign it to users, group or device.
Conditional Access gives advantage to enforce access requirements on device when specific conditions take place.
Microsoft Intune helps to integrate Cloud PC with Microsoft defender for endpoint. For enabling this, you need to create connection to Intune via Microsoft Defender Security Center.
From Monitor perspective, you can monitor device compliance status, baseline, disk encryption and endpoint security. You can check it via Microsoft Intune Center or via notification channel.
Closing Note:
You can give Cloud PC to contract workers who does not need corporate device and will work with orgnization for a month or two. They can install private software as well. Providing Cloud PC to user is super easy as you do not need any IT skill to configure it. You take Windows 365 license and apply it on user, Cloud PC will automatically provision and available to use for that user only. If User has done with work or left the company, you can remove license and Cloud PC will be released. Same License can be applied to other user.
Thanks for reading till this line. Happy to share new and interesting article. Keep following #multicloudsagar on social media and share your views.