Convert Your Old Device into Brand New Cloud OS with Enterprise ChromeOS
After launching ChromeOS in year 2009, Google introduced Chrome Enterprise subscription based product to all customers in year 2017. It gives their customer ability to manage Chrome devices from single pane of glass. You can apply policies on Devices, Users, Apps and Chrome extensions. You can go with two types of licenses, Perpetual and Annual. The perpetual license is valid till the life of the device. The Annual license has same benefit like perpetual but customer need to pay annually. As a new customer, you have option to go with trial version that allows for 30 days validity.
ChromeOS is not only support Google device but also support other models like HP, Dell, Lenovo etc, having Windows or Linux OS running. It comes with inbuilt security and no OS installation cost. It can easily integrate with Citrix and VMware virtual app and desktop products. You can easily convert it into thin device.
The scope of this blogs is to show viewer how you can convert old laptop running on windows into ChromeOS (Cloud OS). Hardware of the device has reached the limitation so you need lighter OS who runs on minimum hardware configuration. This device can be controlled by Chrome Enterprise solution to use it across your orgnization.
It contains two high level steps.
- Install ChromeOS Flex
- Setup Enterprise ChromeOS
1. Install ChromeOS Flex
You can use ChromeOS Flex on Windows, Linux and Mac OS. Sometime hardware of your device is too old to perform any operation. Only option is left with you to scrap it but it may causes Electronic waste to society. I thought to extend the life of it with the power of ChromeOS Flex. It is different from ChromeOS. ChromeOS Flex is suitable for non-google devices whereas ChromeOS is running on Google devices. I will show how to install it with USB drive.
Pre-requisite:
- USB drive with minimum 8 GB size
- Windows/mac/Linux device (laptop/desktop)
- Intel/AMD processor,4 GB RAM,16 GB space
- Backup of your data on USB and portable device
1.1 Image Readiness
- Use your current laptop or desktop. Attach USB drive to USB slot
- Open Chrome browser. Search for Chromebook recovery utility extension. Install it
- Go to chrome browser -> extension , click on it to start installation
- Select model from the given list
- Select Google ChromeOS Flex as manufacture
- Select ChromeOS Flex as product, continue
- Click on Create now. It takes 20-25 minutes to get Image ready
- Once Recovery media is ready, remove USB drive safely
1.2 ChromeOS Installation
- Attach USB drive to your old device, In my case, I had Dell Laptop
- Boot the device and press F12 on your keyboard to enter into BIOS setting
- Select USB Drive as boot device and click to start installation
- You will get message welcome to ChromeOS Flex
- You will get two option, try it first or full installation
- If you want to check look and feel of the OS, you can go with try it first. Once you complete the installation, you will have option at bottom of screen to convert it into full installation mode. Please note that Full installation will erase all your data on Hard drive. This process take 20-30 minutes to complete
- You need to connect to your wi-fi network during installation
- After installation, device will shutdown automatically
- You have to login with your Gmail id and password as first login on the device
- Access ChromeOS and check the performance
2. Setup Enterprise ChromeOS
2.1 Enroll Chrome Enterprise for free
- Login into Google Admin console (https://admin.google.com/)
- Go to Billing -> Subscription -> add subscription for Enterprise ChromeOS
- Select free trial for 30 days under payment plan and checkout. You can later convert it into paid subscription if you have decided at company level.
- New subscriptions may take up to 24 hours to take effect
2.2 – Create Organization Unit
- You have to create orgnization in google admin console. In my case, it has been created. My Orgnization name Name is sagarcloudguru. If you want to understand how to create organization, refer my previous blog – https://multicloudsagar.com/google-cloud-identity/. You will get required details.
- Go to Directory -> Organizational units. Create organizational unit (OU). I have created with name Digital Workspace under root Organizational unit

2.3 Add Users, Group and Role
- Go to user -> Select digital workspace OU
- Add user. Type first, last name and primary email. Set the password. You have option to import users in bulk. I have added user with vdiuser as prefix like vdiuser1 and vdiuser2 for this demo.
- When you go to admin roles in Account Menu, you will see 6 native admin roles (super admin, groups admin, User Management admin, helpdesk admin, storage admin and Services admin).This role can be assigned to user or service account. You can give permission to these users from admin role or you can create custom rule if you want. I have created vdiuser-role as customer role to manage ChromeOS Devices.
- To group all users together in one group, you can create Group from Directory menu. I have created vdiuser-group and set default Access type as of now.
2.4 Enroll ChromeOS Device
- Start your device on which you installed ChromeOS Flex
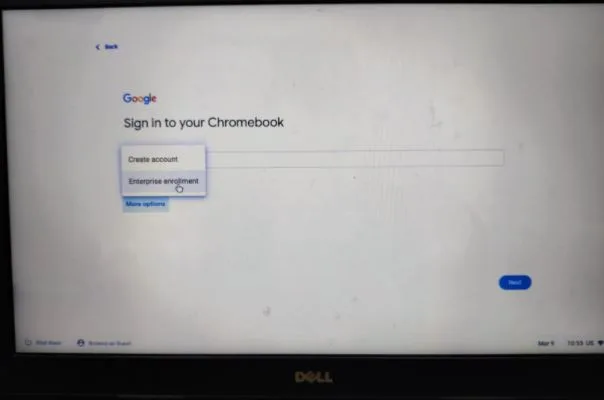
- When you come to login section, click on more option. select Enterprise Enrollment

- Login with Admin credential created into sagarcloudguru.in. In your case, Orgnization will be different.
- You will see message at bottom Chromebook managed by sagarcloudguru.in while logging
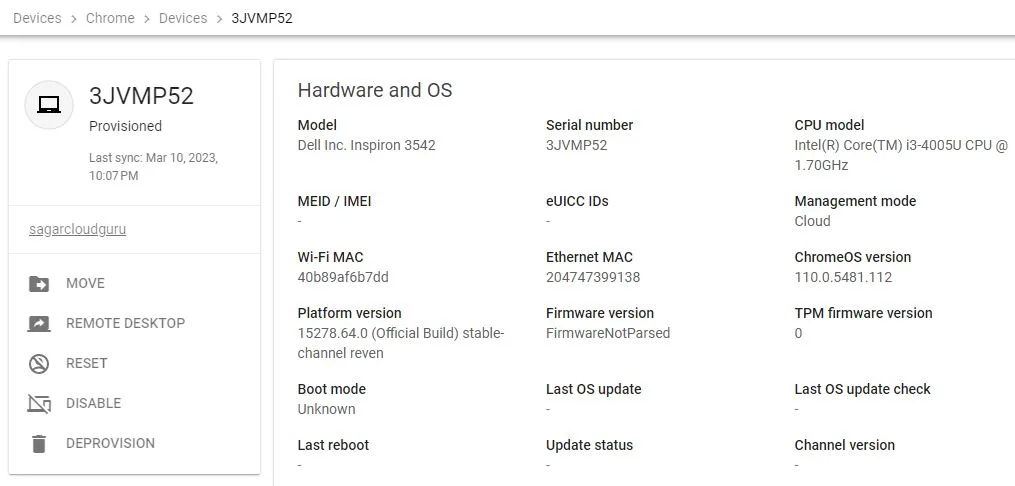
- After device get enrolled successfully, you can see device details in Devices-> Chrome -> Devices section.
2.5 Configure Device Setting
- Go to Devices -> Chrome -> Setting -> Device -> Device Setting. It helps to apply device policies as per organization standards.
- For demo purpose, I have updated wallpaper setting with my website home page image. JPG Image with size below 16 MB is allowed.
- When user login with user credential, they will see default wallpaper on login screen like shown below. Like this you can set many more settings.

2.6 Configure User and Browser Settings
- Go to Devices -> Chrome -> Setting -> user & browser -> user & browser Setting
- For Demo purpose, I have changed custom avatar of vdi users created in Digital Workspace OU with my photo. It will appear while logging by both vdi users. Similarly you can set many more settings user and chrome browser level.

2.7 Configure Managed Guest Session Setting
- When you start your device, You will always have option to login as browse as Guest. Here you do not need any credential. Limited application and setting are available for guest
- You can configure setting to manage guest session. I set customer wallpaper after logging with guest account and block twitter.com site for guest user. When you browse as guest, you will see below screen.

Similarly you can control installation and configuration of chrome extensions, web app and android apps on your devices. There are 700 + settings overall. Google keep adding new settings with new update.
This admin console give us option to control printer. You can fetch reports for devices, app and extensions, android app installations, insights and printers. All these report are available under Report section.
There is one interesting option to force your device to automatically connect to right network. It can be Wi-Fi, Ethernet or Virtual Private Network (VPN).
This is how you can convert any old desktop or Laptop in Chromebook with ChromeOS Flex. Control all devices, Users and app setting with Google Enterprise ChromeOS.
Thanks for reading article. Keep learning and keep growing with #multicloudsagar