Setup Google Cloud Identity for your Org for better management of resources
You have decided to put your workload in Google Cloud Platform. Under Project planning stage, you need to consider Google Cloud identity. It is an “Identity as a Service” solution offered by Google. It helps you to manage user accounts and groups for employees. Centrally control all of your organization’s projects and resources created under Organizational structure. You can configure security guardrails down the line.
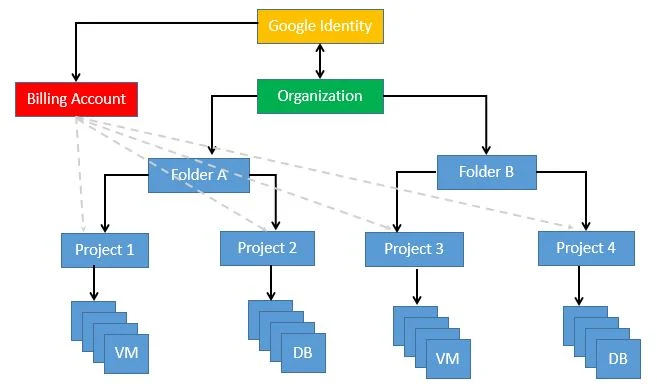
To use Google Cloud, you must use a Google identity service (either Cloud Identity or Workspace ) to administer credentials for users of your Google Cloud resources. Both Cloud Identity and Workspace provide authentication credentials allowing others to access your cloud resources. Workspace offers additional consumer services like Gmail, Google Drive, and other services. Because Workspace offers more features than Cloud Identity, it is also more costly per license. For this reason, you may use Cloud Identity selectively. It give users easy access to apps with single sign-on. Its Multi-factor authentication protects user and company data. Provides Endpoint management enforces policies for personal and corporate devices. Let’s understand relation between GCP cloud identity, organization, billing, folder, project and resources with below diagram.
Today I will share steps to setup Google Cloud Identity in easy way. Before staring, couple of things to consider.
Pre-requisite:
- Google Cloud account with owner permission
- Public Domain
- Permission to add DNS records in external DNS server
When you create GCP console account, you get first project under no-orgnization. If you want to bring your project under one Organization, you have to create cloud identity.
On Google Cloud console, Select the project, go to IAM service –> Identity & Orgnization. You can click on checklist to start setting up.
Initially your current account, is not associated with an organization on Google Cloud. Below checklist is designed for administrators to get a complete control over a company’s Google Cloud resources. It gives you below steps to perform. Out of this, first step is important for us. In order to become a Google Cloud administrator, complete the initial task in the given checklist. Let’s begin.

Deployment Steps:
- On first step, you need to declare what type of user you are, new customer, current workspace customer or current cloud identity customer. In my case, I am new customer. The identity product offers a free and premium edition with more features. I will start with free edition. I will create administrator user first for my new domain.
2. You need to provide Business name and size of your company to proceed. Provide location where business is located. provide email id for further communication. Need to provide company domain name which you own. You can use same domain to setup account. As you are configuring it, you will become account admin. You can assign this role to someone in your team in the later stage.
3. Setup user to manage your cloud identity users. This account will serve as the admin for your google Cloud platform users. This is nothing but super admin role which has Admin console and Admin API privileges. There are other roles like group admin, user management admin, helpdesk admin, Services Admin.
4. You have to agree and create the account.
5. TXT record will appear on your screen. You have to do domain verification. For that , you have to add provided txt records in external DNS server or choose another verification method. Until and unless, you do complete verification process, you can not proceed. Verifying your domain automatically creates an organization resource, which is the root node of your Google Cloud resource hierarchy. You can say as Root Organization Unit (OU).You can create new users if you want in next step. Once it is set up, it will look like below.
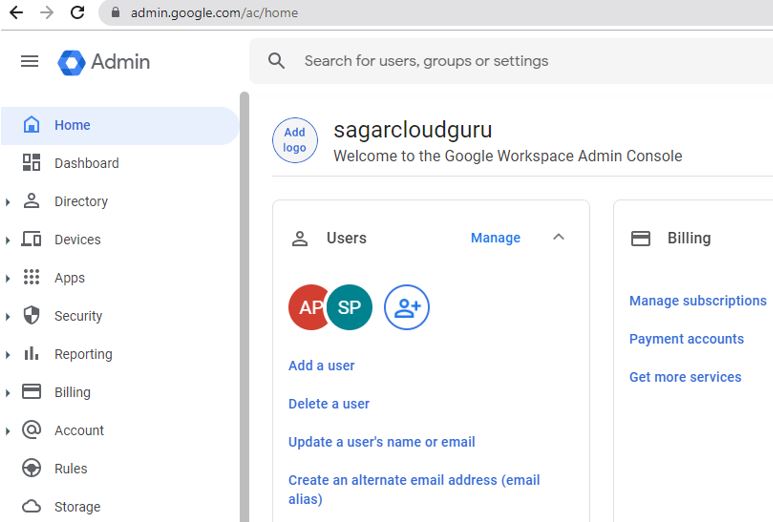
6. Under Directory, you will see five options to configure, user, Group, Organizational units, directory setting , Directory sync. We will see all options one by one.
Click on users, you can create new user under same domain or add users in a bulk. Over there you will get transfer tool for unmanaged users and customize attributes. You can set permission for all users what attributes they can manage by themselves. Groups under Directory helps to create multiple groups and inspect it.
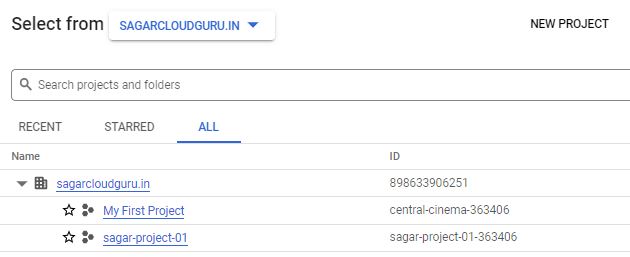
Organization units helps to create hierarchy of OU. Your root OU is constant but remaining OUs can come under root OU or can be part of other OU and they can be moved at any point of time. OU movement takes 24 hours to take effect. Once it is ready, you can see projects under it.
Under Directory setting, you will determine what user info third party apps can see to connect, for example primary email address only. By default, this setting is off.
Directory sync is important feature to sync with your on-premise AD. This feature is in beta. you need VPN connection proceed. As alternate option, you can use Google Cloud Directory Sync (GCDS). I will cover GCDS in my next blog to provide more details.
7. Device Setting provide security to mobile and Desktop devices. Set up devices in minutes and keep your company data more secure with endpoint management. Enforce security policies, wipe company data, deploy apps, view reports, and export details. You need premium edition to enable it. If you go to device option, major ones are Chrome, Mobile and Endpoints.
Under Chrome, you can manage ChromOS devices and Chrome browsers. Step by step guide is available. you can upgrade your windows PC to ChromeOS Flex and take benefit of it.
Under Mobile and Endpoints, you can add desktops. You need to install and configure Google Credential Provider for windows (GCPW) tool. Endpoint management supports and enables BYOD, making it easy to keep your company data safer while letting users to use their favorite personal devices to get work done. As soon as your user’s device gets enrolled in endpoint management, all Wi-Fi and email configurations including server-side certificates get pushed to the device instantly. Agentless setup for basic device management offers wipe and inventory controls for all devices in your fleet, with no user setup or disruption.
8. App section under Admin Console. Majorly covers Google workspace core services.
9. Security setting guides to configure alert, password policies and 2-Step Verification. Reporting helps to monitor employee usage, and examine potential risks via detailed reports and audit logs
10. Billing section cover billing of subscription. Account Section provide account setting, admin roles. Add and delete domains. The Data Migration Service under Account section helps you easily import your data to your Google Workspace account. You can migrate data from Gmail, Google Workspace, Microsoft Exchange servers, Exchange Online, and other IMAP services. There are system defined rules to alert Admin when suspicious activity occurs. Reporting rules is used to get alerts when specific events tracked in audit logs.
You can get help when issues arise with 24/7 support . Phone, email, and chat support is available in 14 languages, included with your Cloud Identity subscription.
With this info, you must have got better understanding of Google Cloud Identity and you can configure it for your organization. Thanks for reading. Keep learning and growing with me.