Zimbra – Cost Effective Email Solution
Zimbra is open source email solution. It is not only provide email solution but also support productivity tools, much needed in any industry. It can be deployed in small, medium and large scale businesses. Security and compliance are forte of this product.
As open source, you have to deploy the software in public cloud or on-premise environment. You can go with paid version as well to get additional benefit.
Synacor company has developed Zimbra product. It also comes with SaaS based email solution to customer worldwide but it is license based. I hope you are excited to know more on Zimbra. Today my focus will be more on technical aspect of Zimbra so anyone can make their hands dirty. Zimbra product can be deployed in Cloud, on-premise and Hybrid mode.
Under Zimbra partnership, your company can become reseller, hosting provider and service partner if you qualify. You get training and direct support with sales and Engineering team. Even though cost of Zimbra email solution is lesser than other ESP (Email Service Providers), you will get good margins and incentives for being partner.
Zimbra open source edition comes with limitation and best suitable for small businesses.
For medium and large businesses, it is recommended to go with network edition, it is paid .Trial version is limited to 60 days with limited mailboxes.
Zimbra open source edition comes with two plans, single server installation.
- Open source + Zimbra Suite Plus
- Open source
Zimbra Network edition, also called collaboration suite, comes with two plans. You can go with single or multi-server installation. You can achieve reliability and redundancy with multi-server installation.
- Professional
- Standard
If you want to know the difference between product and their plans, check following GitHub link.
As pre-requisite , we need to check internal and external communication ports. List is long, hence sharing the link to view and download it. You have to open these port before testing
https://github.com/multicloudsagar/documents/blob/main/Email/Zimbra%20Communication%20Ports.pdf
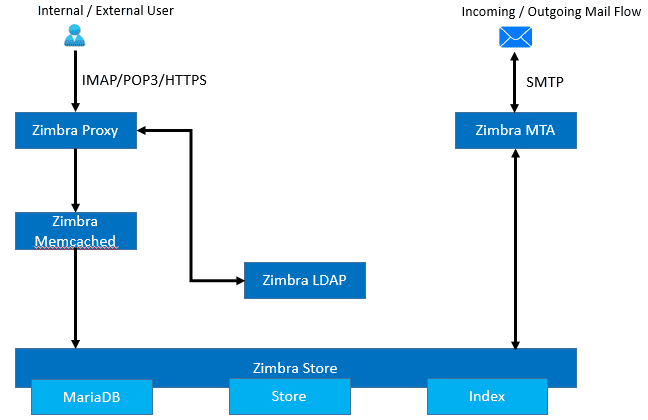
Zimbra Server Components :
We quickly walkthrough Zimbra server components and understand main function.
- Zimbra Core – Provides libraries, utilities, monitoring tools, and basic configuration files.
- Zimbra Store – Covers data store (MariaDB), message store (Emails), index store (Searching) and web application services. All are related with mailbox store.
- Zimbra LDAP – Main purpose is User authentication. Each user account comes with unique mailbox
- Zimbra MTA – Receive emails via SMTP protocol and route it to Mailbox server. Additionally it provides anti-virus and anti-spam capabilities.
- Zimbra Proxy – Works as load balancer for mail traffic coming via POP/IMAP/Https clients.
- Zimbra Memcached – As name suggest, it acts as memory cache for proxy server to improve performance.
- Zimbra SNMP – Does monitoring
- Zimbra Logger – Does logs aggregation and reporting
- Zimbra Spell – Spelling checker for Web Client.
- Zimbra Archiving – Archiving and Discovery feature
- Zimbra Apache – Comes with Zimbra Convertd package.
There are other packages like Zimbra Convertd, Zimbra connect and Zimbra Drive, dependent on Zimbra store. Today we going to see how to install Zimbra open source edition in easy steps in public cloud.
Below is Block Diagram of Zimbra Architecture
Pre-requisite :
- Open ports as per communication ports list
- Public domain
- Access to domain hosting site to add DNS records
- Cloud VM with centos 8, minimum 8 GB of memory
Installation Steps
- Apply static public IP directly to VM. Login into the CentOS VM and check if you can access internet.
2. Login into public domain hosting site, go to DNS management section, create A and MX records as shown below. In your case, Public IP and domain name may differ. My public IP is 20.198.74.42 and domain name is sagarcloud.tk for this demo.

Run below command to check after 15 min
# dig -t A mail.sagarcloud.tk
# dig -t MX sagarcloud.tk
3. Login into your VM which is your Zimbra Email Server. Change login mode to root. In case, you are not able to switch to root account. Run the command with sudo
4. Disable SELinux by running below command. Most of the cases, it comes with permissive mode which is ok to proceed. To completely disable it, open /etc/selinux/config file path with a text editor and set the line SELINUX to disabled.
# setenforce 0
# getenforce
5. Set host name with below command. Here I have changed hostname similar to DNS A record
# hostnamectl set-hostname mail.sagarcloud.tk
6. Point public IP address to hostname with below command.
#
echo "20.198.74.42 mail.sagarcloud.tk mail" >> /etc/hosts
# cat /etc/hosts
7. Check DNS resolver file in Linux and confirm DNS servers are correct.
# cat /etc/resolv.conf
8. In case of Cloud VM, you will not see public IP on NIC card. For domain creation in Zimbra, you should have public IP assigned to NIC card. Go to Network scripts path, create new file and copy the chunk as shown below. Restart the network setting to take effect.
# cd /etc/sysconfig/network-scripts/
# ls
# vi ifcfg-eth0:1
DEVICE=eth0:1
Type=Ethernet
ONBOOT=yes
NM_CONTROLLED=no
BOOTPROTO=none
IPADDR=20.198.74.42
PREFIX=32
# /etc/init.d/network restart
# ifconfig
9. Zimbra MTA (mail transfer agent) component has similar role like postfix tool. Before installing Zimbra package, you need to disable, stop and remove postfix service which comes with CentOS as default. If it is not pre-installed and then you can skip this step.
# systemctl status postfix
# systemctl stop postfix
# systemctl disable postfix
# yum remove postfix
10. Install few packages as dependencies for Zimbra. Run below command without any change
# yum install unzip net-tools sysstat openssh-clients perl-core libaio nmap-ncat libstdc++ wget -y
11. To install zimbra 8.8 version, run below commands in sequential order.
# wget https://files.zimbra.com/downloads/8.8.15_GA/zcs-8.8.15_GA_3953.RHEL8_64.20200629025823.tgz
# tar zxpvf zcs-8.8.15_GA_3953.RHEL8_64.20200629025823.tgz
# cd zcs-8.8.15_GA_3953.RHEL8_64.20200629025823
# ./install.sh
accept agreement and allow access on Zimbra’s package repository by typing Y. To Install the Zimbra packages one by one, put Y against each tool. Put Y again to give permission to Zimbra package to modify system setting.
12. DNS error appears to resolve MX for mail.sagarcloud.tk. Answer Yes to change domain name, type your domain name. if you do not want to create domain at this stage, you type No and proceed. You can create domain from Zimbra administrative console in later stage.
13. In main menu, you will see index with configuration setting, admin password does not set automatically, you need to select number for parameter to be changed. I selected 4 to change admin password in my case.
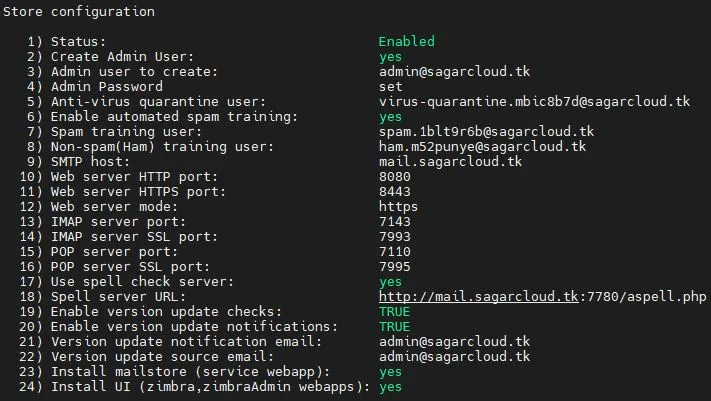
14. Type r to return to previous menu and type a to apply configuration. Put Yes to save configuration in the file on the path /opt/zimbra/config.XXXXX. Put Yes again to allow system modification. Installation will begin.
15. It takes 15-20 mins, If you want notify Zimbra about the installation, you can do by putting Yes after installation completion. Reboot the server.
Post Configuration :
- Check configuration file on the path /opt/zimbra/config.XXXXX, copy email id and URL for future reference
2. Check zimbra services with below commands
# service zimbra status
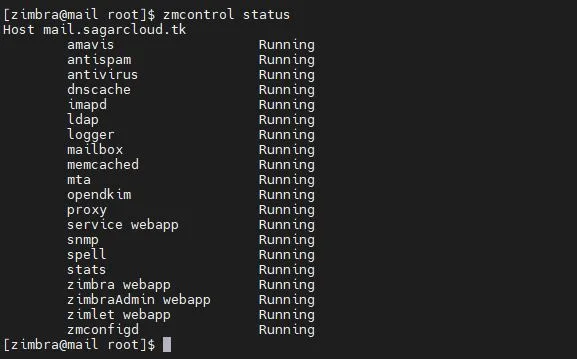
3. Check status of zimbra ports with following command
# netstat -tulpn
Testing :
- login into https://mail.sagarcloud.tk:7071 with admin credential, admin@sagarcloud.tk.
I have not installed SSL certificate hence it will show me, not secure site but you can ignore that.
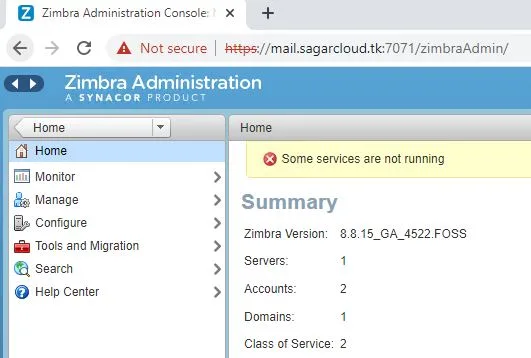
2. Create few users from account management for testing purpose
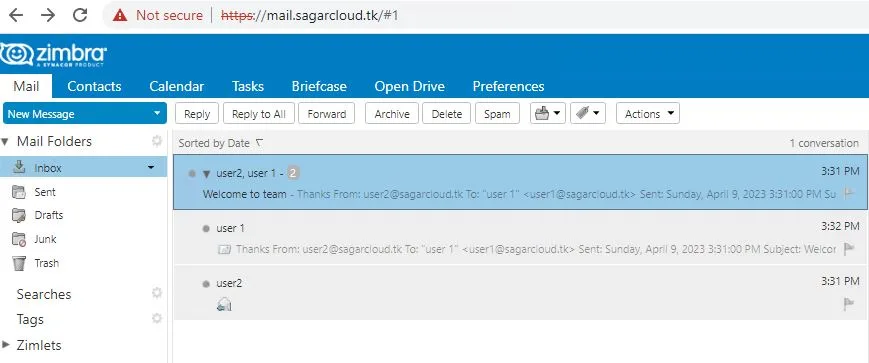
3. Login with any user account on https://mail.sagarcloud.tk, send a mail and check status
For email security, you can generate DKIM, DMARC and SPF records and add it in domain hosting site as DNS records. Free public SSL certificate is available to install for zimbra web URL if you do not have. I have covered how to get free public SSL certificate in previous blog.
On Zimbra administrative console, you will get options to monitor, manage, configure and migrate. To start using Zimbra as Email server, install SSL certificate, set design under class of service (COS). Setup domain, you can connect with internal/external LDAP or external active directory for authentication. Configure Global Access list. Create account for your team and users. You can manage account through same portal.
With Zimbra migration tool, Audriga, you can migrate from on-premise email solution like exchange and Lotus notes. It is self-service migration tool. Remember, migration tool comes with its own limitation. It does not do end-to-end migration.
Thanks for reading the article and I hope you have got a confidence to test this out in your lab or company. Keep following #multicloudsagar to learn and grow.
Leave a Reply