Azure Managed Service Identity Solution – ADDS for your organization
Azure Active Directory Domin Service (ADDS ) is compatible with Windows AD. It is cloud hosted PaaS-based service that provides better management, resiliency, and high availability. Identity resources can be synced with windows AD or Azure AD by using AD connect. It supports DNS, Group Policy, LDAP, NTLM and Kerberos authentication.
ADDS managed domain comes with a single forest with a single domain. By setting up this, resources in the domain can trust the domain of the on-premise forest. it supports one-way outbound forest trust and it is limited to two forest partners
No Additional DNS server is required as It comes with a inbuilt DNS role. Customization of default group policy is very well possible. I have explained in the demo how to connect to it.
If you are using a legacy application that needs windows AD, you can go with ADDS service. It means you can lift and shift your on-premise application into this managed domain.
Setting up ADDS service, you have the option to take domain controllers (DC) from the nearby regions. Deployment of DCs call replica set. You can add more DCs to achieve more resiliency with the replica set option.
ADDS is available with three SKUs, Standard, Enterprise, and Premium. The only difference between them is Backup frequency and query performance. With premium SKU AD backup happens daily, in other versions, it happens in 5 to 3 days’ time. For better query response and less sync time, you can switch to a higher SKU. TCP port 5986 is required for incoming and 443 for outgoing.
You can monitor the health of ADDS managed domain from the console. Able to send notifications to the administrator for any issue occurs with Managed domain.
let’s understand pre-requisite to start installation in a simple steps.
Pre-requisite:
- A valid subscription
- Subscription contributor access to create a resource
- Resource group
- Virtual network and subnet, consider the proximity of azure region, keep it closer to application and resources, do not consider bigger range as it requires 5 IPs.
- Virtual network peering if applications are in different Vnet
- Virtual network private peering if applications are in on-premise
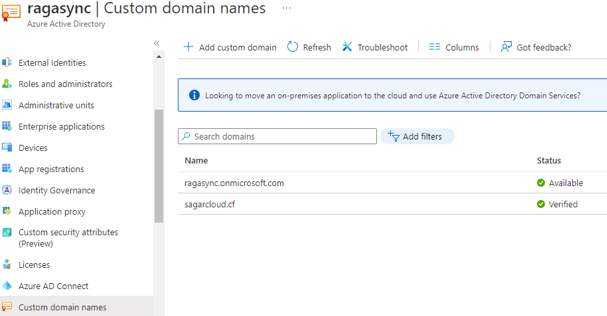
- The public domain is verified under the custom domain of Azure AD (steps explained below)
Install ADDS Service
- Login into the Azure portal, search for Active directory service, go to a custom domain, and add a public domain. It generates TXT records which you need to add to the public hosting domain server as given. In 2-4 hours, you will see the below status as verified
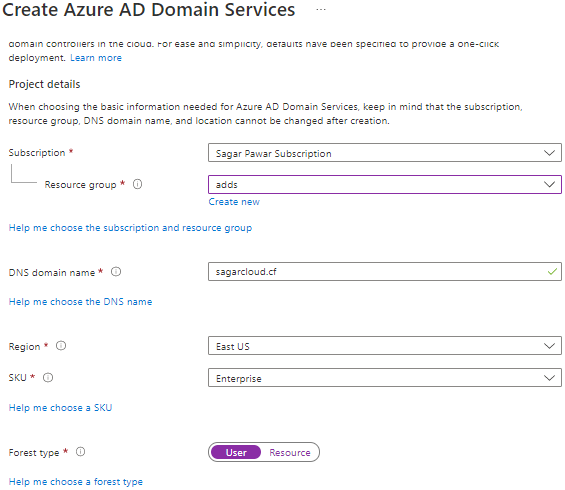
2. Search for AD domain service, click on create, and provide the Subscription, resource group, and verified domain name. Select a region nearby to your application. Select SKU suitable for your requirement.
3. Choose the Virtual network and subnet where ADDS will install. You can new Virtual network and subnet on the same page. Keep a small IP pool.
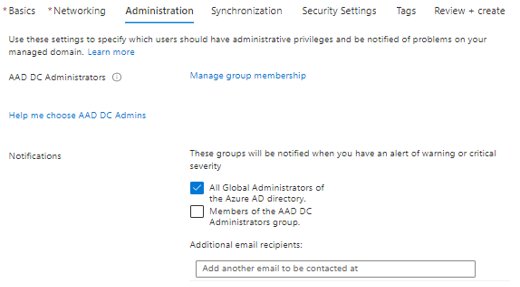
4. To manage administration, you need to add user/s into the AAD DC Administrator group. Members of the group help you to join machines in a domain and send notifications for any issue with the managed domain.
5. Under the Synchronization section, select the default All option. This setting provides a one-way synchronization from Azure AD to ADDS managed domain.
6. Security setting is the important part. You can go with the default option or modify the option which suits your application.

7. Next step is to review and click on Ok to create ADDS service
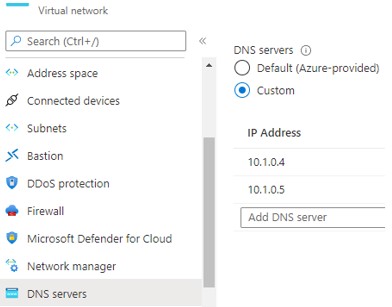
8. ADDS service will take 20-25 min to provision and get ready. After opening the properties of this service, you will get two private IPs from the Virtual network allocated to ADDS service. These two IPs are AD and DNS IPs. You have to set These IPs to the DNS server setting of VNET where your VM will provision or run. If VM is already created, you need to reboot it after setting up DNS.
Adding Windows Machine to Domain
- Login into windows VM with local credentials
- Open the command prompt and type ipconfig /all command, this will show you the primary and secondary DNS server details
- Go to system properties, click on change name. Click on domain and add ADDS domain name.
- It will ask for a Domain admin credential to authenticate the domain joining process
- You can pass user credential which is part of the AAD DC Administrator group
Note: You may face an issue in domain joining after putting in the correct credential. This happens with Azure AD which does not store a hash of the user’s password. You need to reset the password to create to sync hash. This password is a temporary password. you can log into https://myapps.microsoft.com to set a password. Use the updated password for domain joining again.
Adding Linux Machine to Domain
- Login with LINUX (CentOS) VM with a local account
- Run the below commands to join the machine to the domain
| No | Instructions | Commands |
| 1 | Open host file | #sudo vi /etc/hosts |
| 2 | Update these names with your own values Domain : sagarcloud.cf VM name : web2 | 127.0.0.1 web2.sagarcloud.cf web2 |
| 3 | Install additional packages | #sudo yum install adcli realmd sssd krb5-workstation krb5-libs oddjob oddjob-mkhomedir samba-common-tools |
| 4 | Discover managed domain, | #sudo realm discover SAGARCLOUD.CF |
| 5 | Initialize Kerberos User name : dsadmin | #kinit dsadmin@SAGARCLOUD.CF |
| 6 | Join VM | #sudo realm join –verbose SAGARCLOUD.CF -U ‘ dsadmin@SAGARCLOUD.CF’ –membership-software=adcli |
| 7 | Enable password authentication if not | #sudo vi /etc/ssh/sshd_config #PasswordAuthentication yes #sudo systemctl restart sshd |
| 8 | Allow AAD DC Administrator group to login | #Sudo visudo #Add ‘AAD DC Administrators’ group members as admins. %AAD\ DC\ Administrators@aaddscontoso.com ALL=(ALL) NOPASSWD:ALL |
| 9 | VM login | #ssh -l dsadmin@SAGARCLOUD.CF web2.sagarcloud.cf |
| 10 | Update patches | #sudo yum update |
Note: Use uppercase letter for commands where it has mention
ADDS Domain Management
- Login into the domain joined the windows machine
- Open Server manager from the start
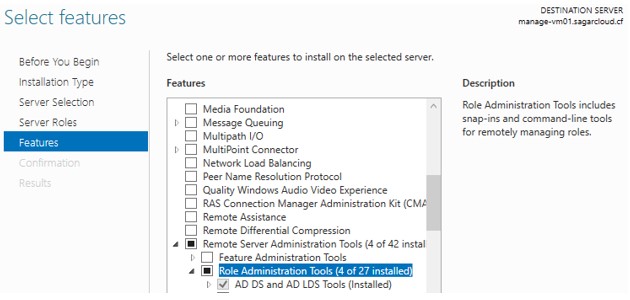
- Go to manage -> add roles and features
- Under the feature section, you have to add AD DS and AD LDS Tools from Remote Server administration
- To modify default group policies, you can add GPMC (Group Policy Management Console) from the feature section. This is available under the tool section, if you click on it, you can default policies which you can modify
- Same thing with the DNS server. If you want to modify DNS records or Zone, first you need to add DNS server tools. Whatever tools available under the Role Administrator tool, you can install and manage
- After adding features, you can open these tools from the tool section under Server manager on your windows machine.
A few important points are to be noted to using ADDS managed domain for Hybrid or cloud-only organization
- Azure ADDS service is schema can not be extended, federation with other domains is not possible and LDAP is read-only.
- You will not get domain or enterprise admin accounts.
- You can not get the liberty to create multiple domains in a single forest.
- If users in some organizations use smart card options for login and they do not have their password, ADDS does not support them here.
- Guest users can not be invited to ADDS service domain.
- Running ADDS will not move to a different subscription, resource group, or Virtual network.
I hope this blog has helped you to understand ADDS service and how to set up it.