Getting Public SSL Certificate Free of Cost for a Lifetime
When you publish your website, you are always a bit concerned about its security of it. From a Security point of view, an SSL certificate plays a major role to authenticate the identity of the website. SSL stands for Secure Socket Layer which creates a secure tunnel between the web server and the client browser to keep online transactions private. In another way, it prevents hackers from reading or modifying information transferred between two systems. It is always recommended to check the padlock next to the website, you are visiting. If it exists means visiting the website is secure to connect.
There is another article written by me on SSL certificates. This helps to get a free SSL certificate by using Window Server CA. You can use this for internal communication in a lower environment. You can refer to the Blog URL https://multicloudsagar.com/free-private-ssl-certificate/ if you are interested.
SSL certificates can be used in various places like Email communication, web-based applications, Server to Server communication, DB Encryption, etc.
SSL certificate falls into three Major categories, Domain Validation (DV), Organization Validation (OV) and Extended Validation (EV).
Domain Validation SSL Certificate is useful for the individual party who owns the domain name. You do not need to have a business to get this certificate. It will be assigned quickly.
Organization Validation SSL Certificate is designed for Organization that has legally registered business. It takes 1 to 3 days to receive.
Extended Validation SSL Certificate comes with the highest level of trust. This type of certificate is easy to identify as it shows a green bar next to the domain name in the browser. It takes 1 to 5 days to receive.
Once you have an SSL certificate, the next step is to identify the number of different domains or sub-domains you are going to secure with this certificate. You can go with multi-domain SSL (also called SAN SSL) which covers multiple domains, including sub-domains of a single domain name. It also supports different domain names. Another option is with you to get a wildcard SSL certificate that supports a single domain and all subdomains come under the main domain.
Today we are going to see how to install an SSL certificate free of cost without paying any money. To enable HTTPS connection for the website, you need a certificate from Certificate Authority (CA).
Let’s Encrypt is an open-source CA that uses the ACME (Automatic Certificate Management Environment) protocol and provides free TLS/SSL certificates to any compatible client. It is standard protocol for interacting with the service to retrieve and renew certificates automatically. The official ACME client is called Certbot, though many alternative clients exist.
ISRG (Internet Security Research Group) developed the CA project for financial, technological, and educational barriers to secure the connection over the internet. These certificates are applicable to websites. It does Certificate lifecycle management. Let’s understand key features first.
Key features are:
- Domain name owners can obtain a trusted certificate in free of cost
- Certificates are domain based so no IP is required
- Does not store a private key
- The agent running on a web server can interact with Let’s Encrypt CA to obtain a certificate and configure it
- Let’s Encrypt will serve as a platform for advancing TLS security best practices
- All certificates issued or revoked will be publicly recorded and available for anyone to inspect
- Comes with 90 days validity which gets auto-renewal so can extend for longer time
- The automatic issuance and renewal protocol is published as an open standard that others can adopt
- Support major operating systems and web applications
- Trusted by all key internet browsers
- Domain-based so no IP address is required
- Free of cost
- Extend to multiple domains with multi-domain or wildcard options
Steps to get SSL Certificate for any domain:
There are two steps to this process.
Step 1: The installed Certificate management agent (CertBot) in the web server generates key pair and informs the Let’s Encrypt CA that the web server controls a domain and asks what needs to prove it. CA check the requested domain and send one or more set of challenges to Agent. Also, send nonce (arbitrary number) to an agent which is required to prove key pair is controlled by the agent only. Agent completes the set of challenges and signs provided nonce with key pair. CA check if challenges are answered correctly and verify the signature on the nonce. If it is done successfully, the agent gets ready to do certification management.
Step 2: The agent creates CSR (Certificate Signing Request) to get a public key from CA for a specified domain. It includes a private key signature corresponding to the public key. Once the request reaches CA, it verifies both signatures and issues Certificates for a domain.
Demo – Installing SSL certificate on IIS Webserver
Step 1: Set up windows Server with public IP. Allow incoming port 443 for all networks. For outbound, open ports 80 and 443. Make sure you have admin/root permission.
Step 2: Install the IIS role through GUI or the command line mentioned below. Check website is up with a private or public IP address. By default, the default website is available.
#Install-Windows Feature -Name Web-Server -IncludeManagementTools
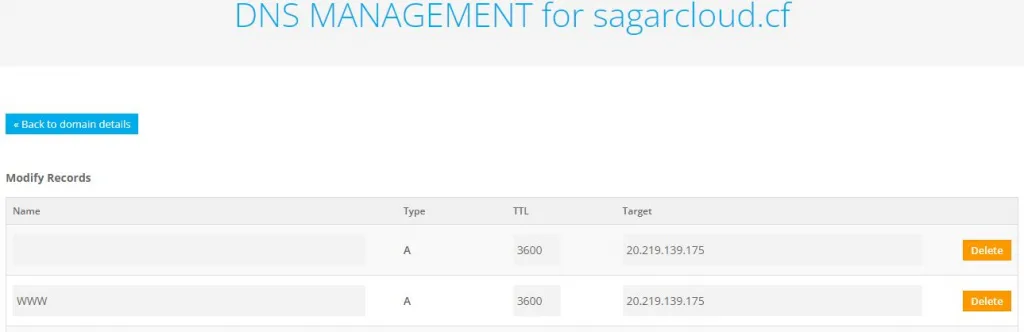
Step 3: Take the public domain and add DNS A record on the domain hosting server. This record will resolve the domain name to the IP address.
Step 4: You need to do domain binding as shown below. You can do domain binding with http or https as well. In the case of HTTPS, you have to use a dummy certificate initially. I have used HTTP to show you.

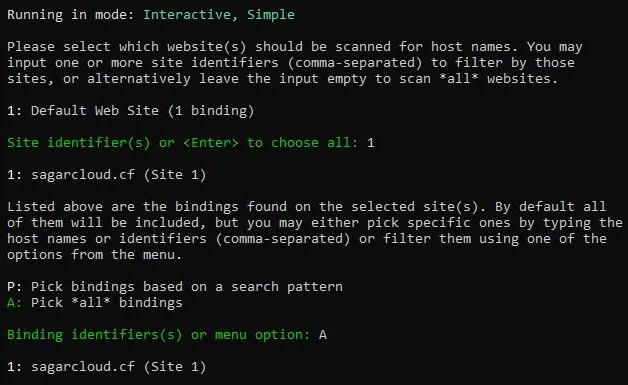
Step 5: Go to the site https://www.win-acme.com/ and download the latest agent. It is a zipped file. Copy it into a separate folder. You have to unzip it and run the wacs.exe application to start the agent. It automatically connects to CA server. Once the connection is established, it will ask to create the certificate.

Step 6: Type N to start the certificate creation process. It will detect the default website and binding. In my case there is one binding hence I selected all binding. You also have the option to choose particular binding from the list if there is more than one binding.
Step 7: Type yes at two stages to proceed. Provide email id for email notification in case of any abuse or problem. Certificate generation and assignment will begin.
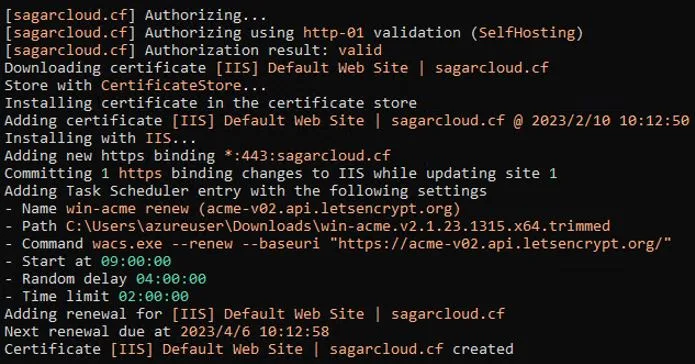
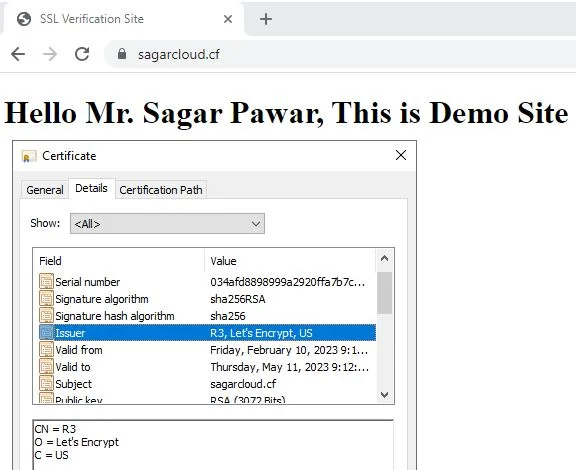
Step 8: Browse the website again, you will see an SSL padlock next to your site. if you click on it, you will get certificate details. This Certificate is stored in the Certificate manager –> Website hosting folder
While installing the certificate, the agent also creates the scheduled task to renew the certificate periodically. It also gives you multiple options to manage secrets, recreate scheduled tasks, test emails, check for updates, and import scheduled renewals.
If you want to generate multiple certificates for your org, it is better option to have single windows server having ACMEv2 Agent installed. From there you can generate certificate for single domain or wildcard domain by taking DNS based challenge.
Generating Wildcard Certificate :
- Login into system where agent is installed. Start the agent
2. Select M option to generate certificate with manual process
3. Next option to choose manual Input from 4 available options
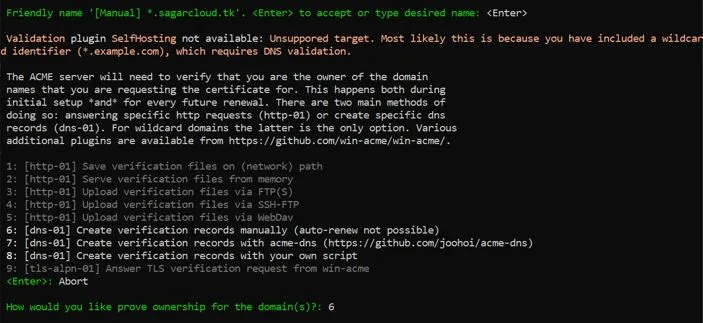
4. Provide host domain details. In my case it is *.sagarcloud.tk
5. Next step is put friendly name. I used same DNS name mentioned above
6. You will have two methods, sending either https request or DNS request for ACME server to verify your are owner of the domain. If you have single certificate then you can go with any one. This is not case with wildcard certificate, only DNS request based validation option is available. I selected 6th the option from the below list.
7. After the ownership of the domain(s) validation, Certificate Signing Request (CSR) will be created to obtain the actual certificate. The CSR determines properties of the certificate. If you are not sure what key to select, choose RSA as default.
8. You can store Certificate in one or more ways to make it accessible to your applications. You can choose the Windows Certificate Store is the default location for IIS.
9. Choose Webhosting as store to keep certificate after generation
10. If you do not want to store it in any other place than Windows Certificate Store, you can skip further steps for the same.
11. DNS validation will start and provide TXT record. You need to add this record in Domain hosting server to prove your ownership. Add value in record without double quote.
12. After adding the record, you need to wait for 15-20 min to replicate the changes.
13. Hit Enter to verify the record. If successful, Preliminary validation will succeed
14. You can delete TXT record. After deleting, you can Enter to start certification generation
15. Certificate will create and store it in certificate manager of local Machine in webhosting folder
16. You can bind this certificate with your domain considering you have created subdomain and A record on your DNS server.
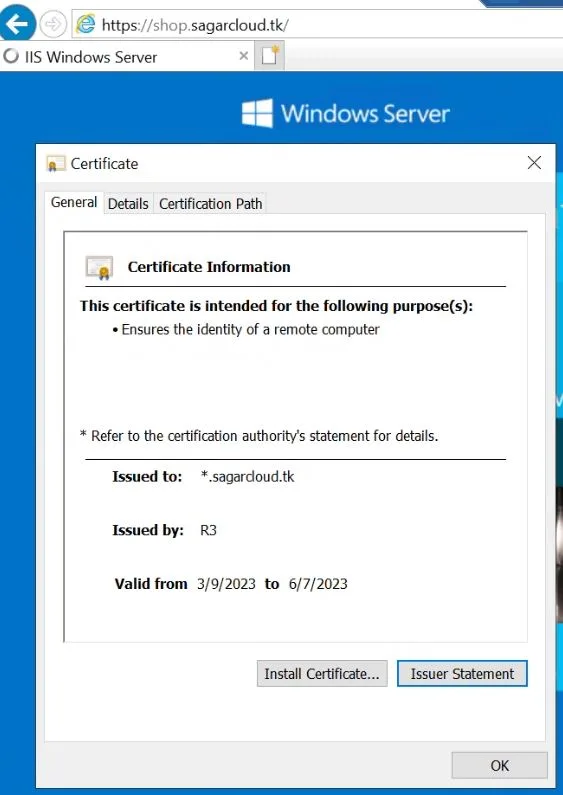
17. In my case, it is shop.sagarcloud.tk.
18. Now you can access website over the internet with wildcard certificate. You can click on lock icon on browser to view the certificate.
The provided SSL certificate by Let’s Encrypt CA comes with some limitations.
Limitation:
- Only support DO, no support for EV and OV
- Community-based support
- No GUI, only CLI-based operation
- No Centralized dashboard and reporting available
So far Let’s Encrypt has provided SSL certificates to 300 Million websites worldwide including major IT companies. Their SSL certificates have been working well with Apache, NGNIX, HAProxy, and Plesk websites. Good Community support is available for it. You can try with other software as well.
Thanks for reading. Keep learning with #multicloudsagar and grow in your career.