How to use AWS REST API for operation work
REST (Representational State Transfer) API is an interface that two computer systems use to exchange information securely over the internet. REST is a software architecture that imposes conditions on how an API should work. REST API supports the exchange of the information because it works with secure, reliable, and efficient software communication standards. This article will focus how to create service account and provide permission. Then we will understand API reference documentation and execute AWS REST API through Postman tool.
Below are high level steps
- Service Account Creation
- Postman Tool Setup
- Simple API Execution
- Complex API Execution
Steps Execution
Service Account Creation
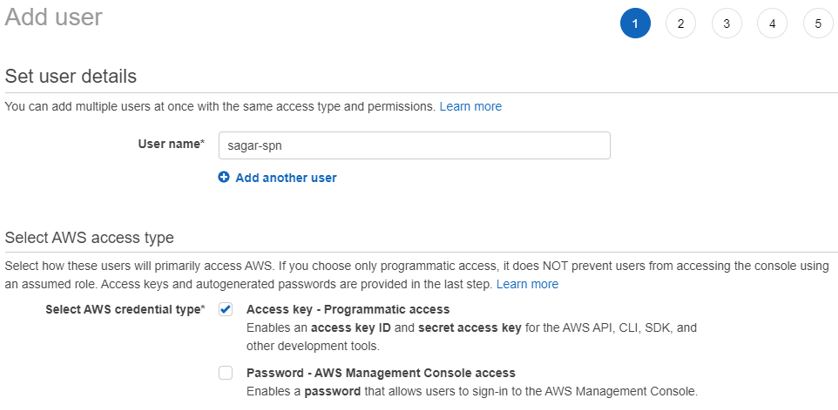
- Login AWS account with Admin user, go to IAM Portal. Click on Add user. As this user will be service account, we will enable Access-Key option for Application Programming Interface (API) call. We will not enable password – AWS Management Console Access.
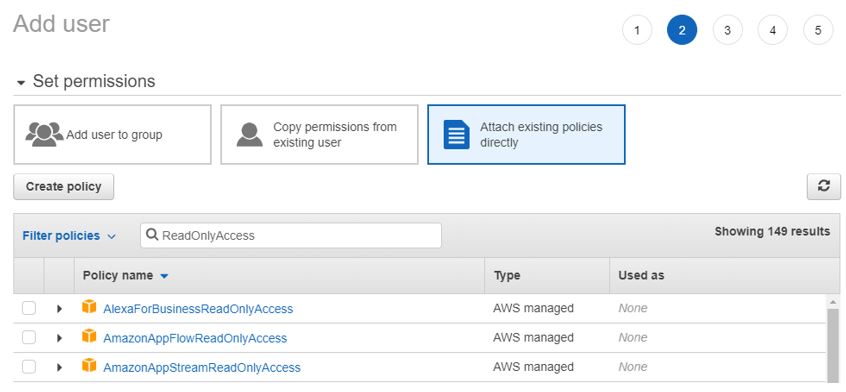
2. On second page, you will get three options for providing permission to Service account. As this service account will be used for discovery, I will provide ReadOnlyAccess to user via AWS Policy. According to your use case, you apply right level permission to your service account.
3. Provide tag to display the role of this account. Review and create it.
4. You will get Access key and Secret access key. You either copy it or download locally.
Postman Tool Setup
You can use any API tool to make a query. I given steps for postman as it is well known tool and most of professional is using it. Below are high level steps.
- Download postman tool from the path https://www.postman.com/downloads/
- Install and launch it.
- Click New on Top Left and choose Request. Enter API request name and save under new collection or folder
Simple API Execution
- I am showing you how to make API call for AWS Services. Before that, you need to understand how to fire API in AWS. Endpoint syntax is https://<AWS Resource name>.<AWS Region>.amazoneaws.com for all APIs.
- You will see two example to get better idea of API call. I will start with VPC discovery in my AWS account. You will get API call details for VPC under Amazon Elastic Compute Cloud API reference documentation. It will be in below format
| https://ec2.amazonaws.com/?Action=DescribeVpcs &AUTHPARAMS |
3. For better understanding, you can put API in tabular format before making a call through postman. Then put same details in Postman tool to discover VPCs in your account.
| End point URL | https://ec2.ap-south-1.amazonaws.com/?Version=2016-11-15&Action=DescribeVpcs |
| METHOD | GET |
| Authorization | AWS Signature: Access Key |
| Authorization | AWS Signature: SecretKey |
| Authorization | AWS Region : ap-south-1 |
| Authorization | Service name : ec2 |
See how authorization screen look like.

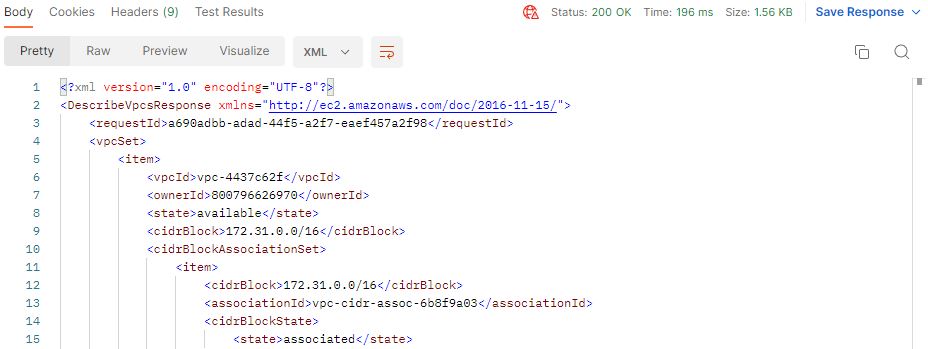
4. On successful execution, you will find the status code as “200” and the output of the REST API is available in the body.
Complex API Execution
1. In some cases, endpoint URL are fixed for global services. I have shown some example for your understanding.
Cost Explorer API endpoint: https://ce.us-east-1.amazonaws.com
AWS Cost and Usage Report API endpoint: https://cur.us-east-1.amazonaws.com
AWS Orgnization Endpoint: https://organizations.us-east-1.amazonaws.com
2. You will see another example. When you go to API documentation, you will see something like below. It has been taken from GetCostandUsage Action of AWS Cost Explorer API documentation
| POST / HTTP/1.1 Host: ce.us-east-1.amazonaws.com x-amz-Date: Authorization: AWS4-HMAC-SHA256 Credential=, SignedHeaders=contenttype;date;host;user- agent;x-amz-date;x-amz-target;x-amzn-requestid,Signature= User-Agent: Content-Type: application/x-amz-json-1.1 Content-Length: Connection: Keep-Alive X-Amz-Target: AWSInsightsIndexService.GetCostAndUsage { “TimePeriod”: { “Start”:”2017-09-01″, “End”: “2017-10-01” }, “Granularity”: “MONTHLY”, “Filter”: { “Dimensions”: { “Key”: “SERVICE”, “Values”: [ “Amazon Simple Storage Service” ] } }, “Metrics”:[“BlendedCost”, “UnblendedCost”, “UsageQuantity”] } |
3. Let’s decode above text. Endpoint URL is not given that’s mean URL is provided at start of the API document (on welcome screen). Then add Add info in postman tool.
| End point URL | https://ce.us-east-1.amazonaws.com |
| METHOD | POST |
| Header Parameter | Content-Type : application/x-amz-json-1.1 |
| Header Parameter | X-Amz-Target : AWSInsightsIndexService.GetCostAndUsage |
| Authorization | AWS Signature: Access Key |
| Authorization | AWS Signature: SecretKey |
| Authorization | AWS Region : us-east-1 |
| Authorization | Service name : ce |
| Body Payload | { “TimePeriod”: { “Start”:”2017-09-01″, “End”: “2017-10-01” }, “Granularity”: “MONTHLY”, “Filter”: { “Dimensions”: { “Key”: “SERVICE”, “Values”: [ “Amazon Simple Storage Service” ] } }, “Metrics”:[“BlendedCost”, “UnblendedCost”, “UsageQuantity”] } |
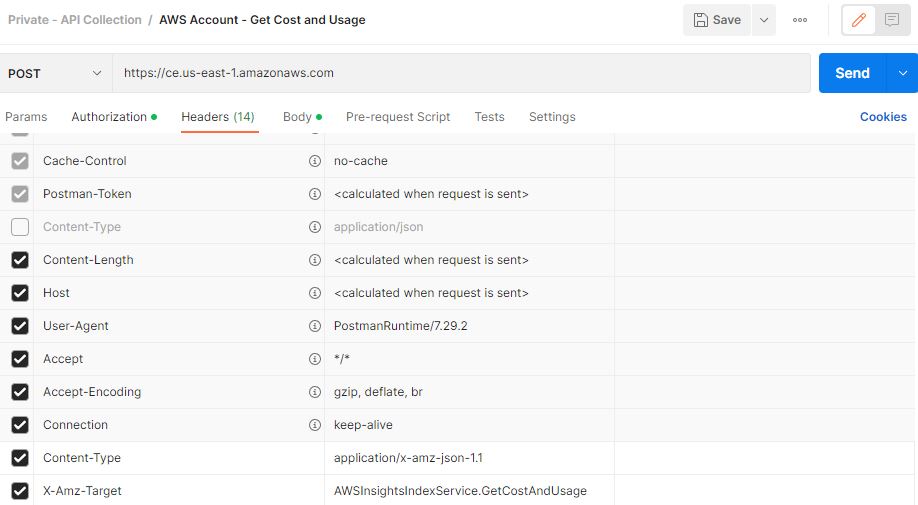
See how headers look like.
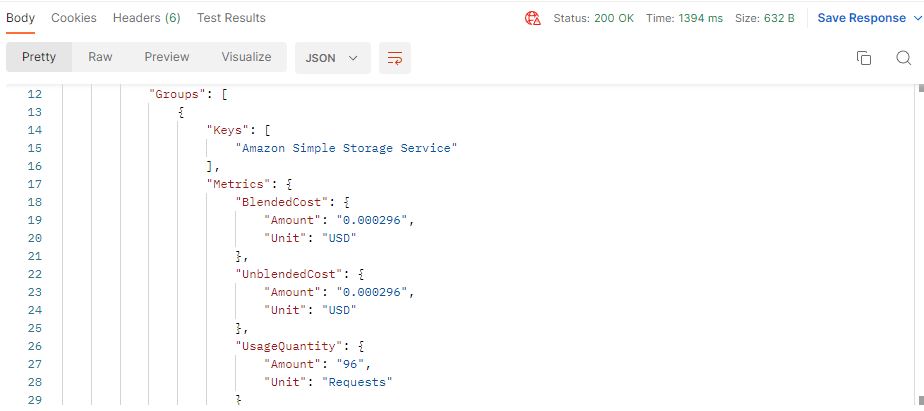
4. On successful execution, you will find the status code as “200” and the output of the REST API is available in the body
You must have got some idea about making API calls in AWS cloud. With above info, anyone in your team can make API call without any prior knowledge. You can refer long list of API reference document on the link – https://docs.aws.amazon.com/index.html#lang/en_us.
If you are comfortable with postman, you can refer AWS ready collection on the link , https://www.postman.com/api-evangelist/workspace/amazon-web-services-aws/collection/35240-27f83bb7-4ad5-4571-80f4-1fa618a02314
Thanks for reading the article. Keep learning and growing.