Accessing AWS Services from Azure over cloud VPN
Nowadays, customers keep workloads on different regions in the same cloud or different clouds to achieve better resiliency to applications. You will also notice that customers want to test the services of other clouds to explore their features. We came across a such requirement for one customer. They wanted to explore the AWS workspace (VDI solution) service in the AWS cloud and the requirement was to access it via their existing Azure cloud AD accounts.
Considering this is new a requirement, we achieved it with a better project plan. Lot of steps which you will see in this article, we have created a blog for each service already. We will share the blog link as we progress. We will cover high-level steps in this article.
Pre-requisite
- Get Admin permission on AWS Account
- Get Owner permission on Azure Subscription
- Create Resource Group
- Create VPC/Subnet/route/NSG in AWS Cloud – CIDR range – 192.168.0.0/16
- Create VNET/Subnets/route table/Security group in Azure cloud – CIDR range – 10.0.0.0/16
Installation Steps as Performed in Real Scenario
- Login into Azure Portal. Search for Azure Active Directory Domain Service (ADDS) and click on create. Configure it as mentioned in my blog – https://multicloudsagar.com/adds/
2. Create an Azure SPN account as mentioned in my other blog – https://multicloudsagar.com/azure-service-principle-name/ . This Account will be used by AWS AD Connector to connect with Azure AD
3. To Setup AD Connector in AWS, go to Azure ADDS service –> Properties –> Copy private IP addresses. Copy the Azure SPN account and password. Go back to the AWS Directory service –> select AD connector option. Select the Directory size according to your use. Choose VPC with private subnets. Configure AD Connector with Azure AD and SPN details.
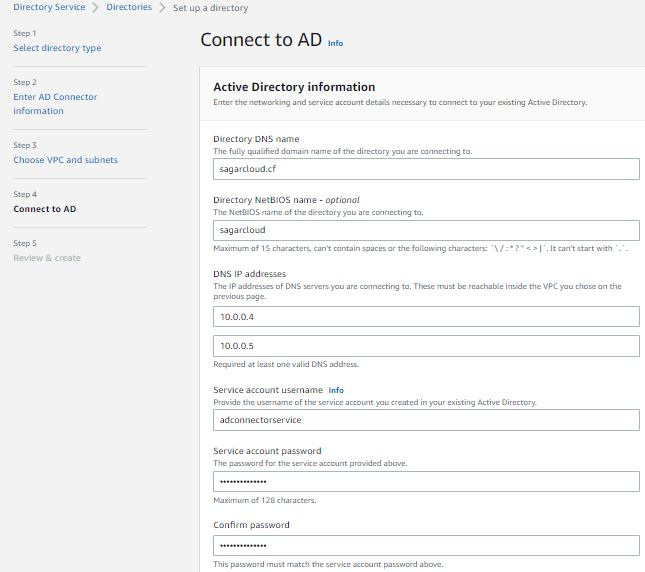
4. You have to register the Active Directory connector. Open Amazon Workspaces –> Directories. Select the Directory (sagarcloud.cf) that you created in the previous step. Click on the action and register.
5. Create Workspaces by selecting the registered directory. To understand how to create a workspace, you can refer my blog – https://multicloudsagar.com/aws-workspace/
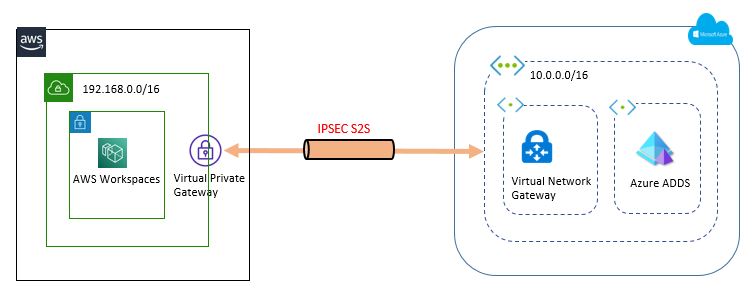
6. You have added the Private IP of Azure ADDS service in the AD Connector configuration. It won’t accessible until and unless you need VPN in place. So our next step is to set up VPN. Again it is a very simple step. Refer Diagram to get an understanding of our connectivity.
7. Connect to the Azure portal, and create GatewaySubnet in the existing VNET which you have used for ADDS service. You have to create a fixed name that will be used for Virtual Network Gateway.
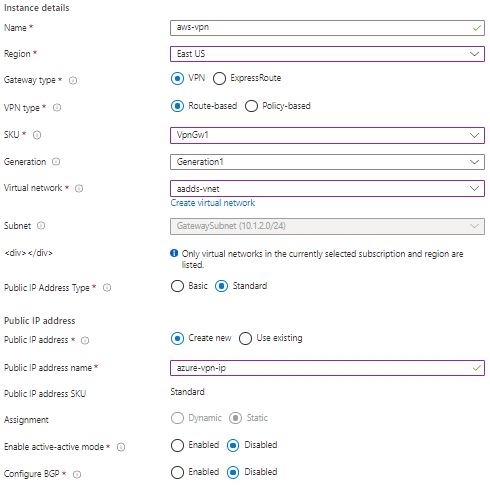
8. Create Virtual Network Gateway. When clicking on the network virtual gateway on Azure Portal. verify subscription. You can use existing or create a new resource group. Select region from drop-down list. Provide name and region. Select the VPN gateway type and VPN type as Route-based. The Route based gateway is always the preferred option. Select the SKU type from the drop-down list. SKU type may vary depending on the region selection. You can check Microsoft documentation to get the capacity of each SKU type. Based on the SKU type selection, the Generation category will auto-populate. After selecting Virtual Network, GatewaySubnet will be selected automatically. You can create public new public IP or use an existing one. The public IP assignment will be always static. You can enable active-active mode based on SKU selection. Enabling this option leads to another public IP assignment to Virtual Network Gateway. BGP option is available for route based gateway and for limited SKU type.
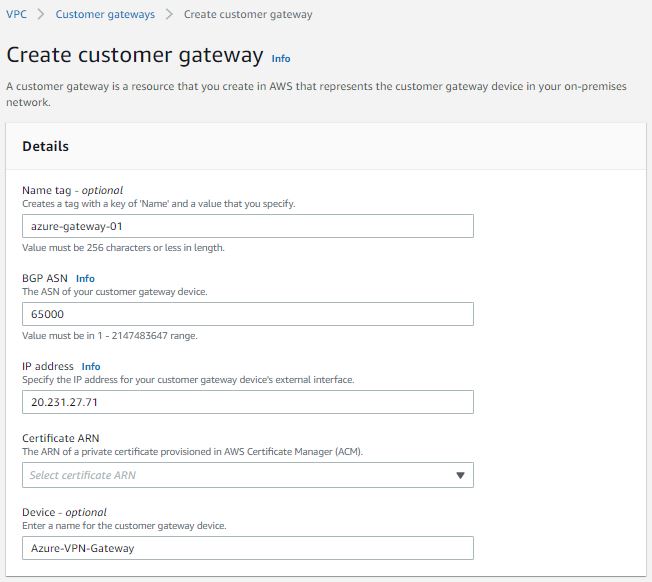
9. Connect to AWS account, Go to VPC -> customer gateway. Click on create. Provide tag, keep default ASN value. Enter the Public IP of Azure Virtual Network Gateway. ARN certification is optional.
10. Create AWS Virtual Private Gateway with tag and default ASN. Attach it with AWS VPC.
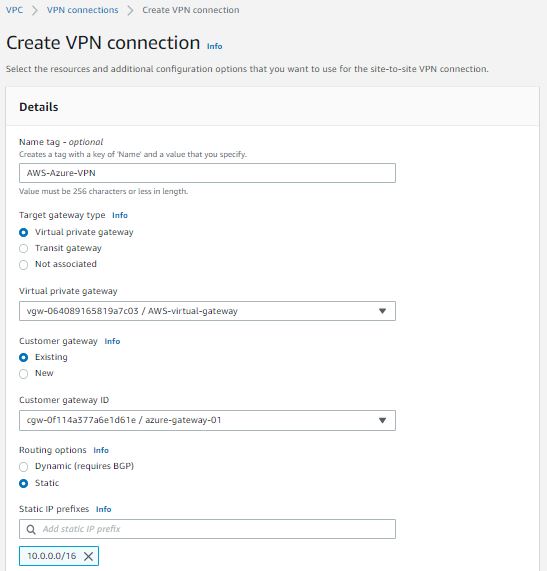
11. Create a Site-to-Site VPN connection. This option is available on the VPC console. Provide a name tag for your connection. Select the existing Virtual private gateway and Customer gateway from the drop-down. Under the routing option, select the static route and add the CIDR range of Azure VNET where ADDS and Virtual Network Gateway are running. Keep other options default.
12. It will take some time to up the tunnel. Once the tunnel is up, download the configuration file from the Site-to-site VPN connection. Verify IPsec Tunnel, Pre-shared Key, and Outside IP address in the file.
13. Connect to Azure Portal and go to Virtual network gateway. Create a local network gateway. Provide Name to local gateway, put Public IP of AWS Virtual private gateway.
14. Create a Connection between the Azure Virtual network gateway and Local Network gateway. You need to upload the pre-shared key from the configuration file available in step #12
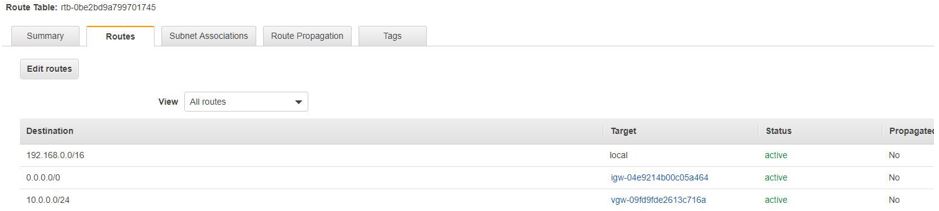
15. Add a Virtual private gateway to the routing table of AWS VPC.
16. Open required ports for ADDS service. Check connectivity between Azure and AWS. Once it is successful, you can move to AWS Workspace for adding users from Azure AD and provide them access on to VDI service.
After reading this article you understood the process of setup a VPN between AWS and Azure.