AWS S3 Migration to Azure in Bulk with Data Factory
When you plan to migrate from one cloud to another. Major data you keep in object storage considering high availability, resiliency and Managed service. It is mostly used to store un-structured data like images, video and audio files. Other than this it is also used to store backup and log files. Now you imagine if any company running their workload in AWS cloud for long time, data in S3 buckets would be large quantity. You are asked to migrate all S3 buckets to Azure storage account. What will be your approach here?
For this type of migration you have three options
- Azcopy – You can use command line tool to migrate data. It is best suited for small data and time duration is flexible. This command can be used in online or offline data transfer.
- Azure Databox – You can adopt this service for offline approach. In running business, you can migrate the huge data in TB or PB but few buckets are active in production so online data sync may be an challenge in this.
- Azure Data Factory – It is best suited if you are going with online data transfer. It easy to configure .
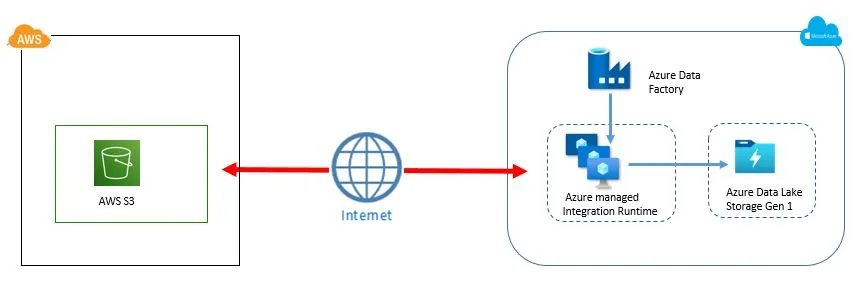
Today we are going to see how to configure Azure Data Factory and migrate the data. Find high level architecture
Pre-requisite :
- Active user in AWS IAM having access key id and secrets
- All S3 buckets are accessible publicly if not private connectivity
- Azure subscription with at least storage account contributor permission
- Storage Data lake storage with Gen1
- List of containers having public read access if not private connectivity
High level Steps:
- Data Factory Service Creation
- Data Factory Service Configuration
- Data Factory Service Monitoring and Logging
- Validation
Installation Steps:
1. Data Factory Service Creation
While creating Azure Data Factory, specify the valid subscription and resource group. Use unique name across Microsoft Azure. Select same region where AWS S3 bucket region located to reduce latency. Current Data Factory version is V2. As additional option, you can configure Git repository with either azure DevOps or Github. In our case, it is not applicable.
In networking section, how you want to go with Integration Runtime (IR) instance. Azure managed or self-hosted. You can configure it with public or private endpoint. In my case, I am going to use Azure managed Integration Runtime with Public Endpoint. It provides integration capability between Source dataset and Destination dataset for data transfer. Under advanced option, customer can bring their encryption key. Provide tags. Review and create the service.
2. Data Factory Service Configuration
Once Data Factory service is ready, you can launch the studio. Click on Ingest and choose Built-in-copy task under properties. Either you can go with run once now or schedule. I am going with run once for this demo.

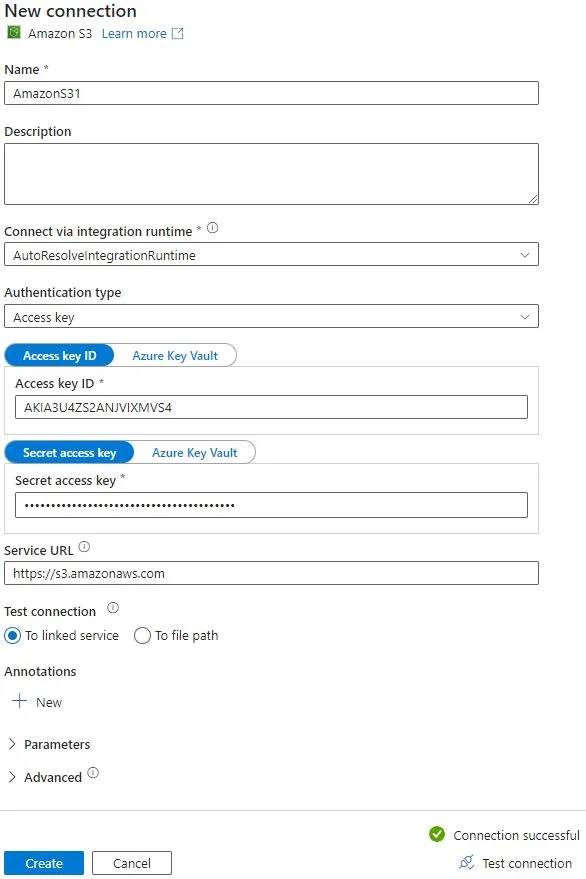
On next page, you have to select source , you need to select source from drop-down list. my source is Amazon S3 in this case. Under connection , create new connection with IAM access key id and secrets. At bottom of the form, test the connection. If connection is successful, create a connection as shown below.
On Source dataset section, select folder or files you want to migrate. You can browse and access folder of S3 bucket from the same screen. You can enable Binary copy so files will be treated as binary data. You should enable recursively option to copy subfolders under main folder. You can limit concurrent connections if you want. By default it takes upper allowed limit. Filter data option is available based on modified time stamp between start and end time. Set file format setting if you want. I have kept it default in my case.
Next thing is to set destination dataset. select destination as azure storage account. You need to create new connection. Fill all required details of storage account container. While filling details, either you can take subscription and storage account name or directly use account name and key, at the bottom of page, test the connection . If it is successful, proceed to create it.
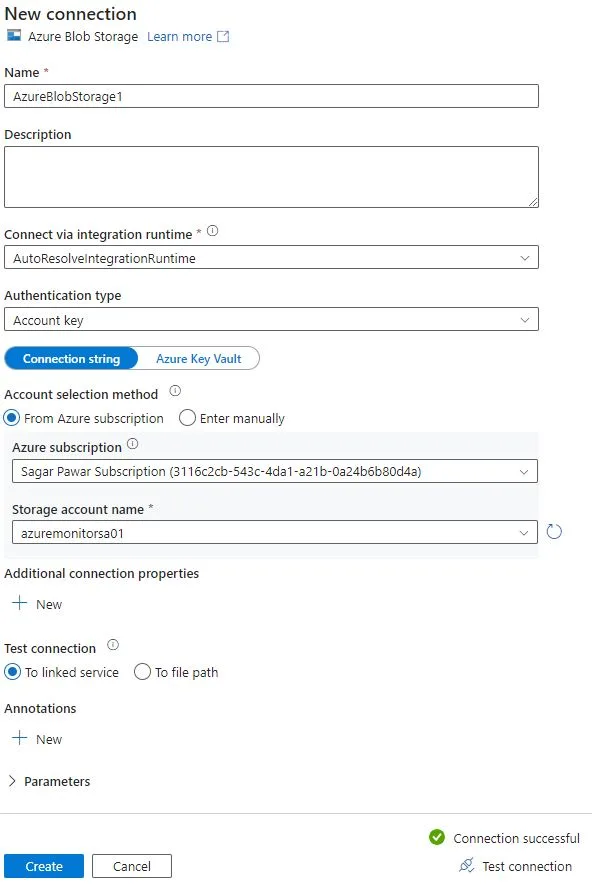
Please note, public endpoint is enabled for Azure Blob hence I am able to test connection. If you want to connect privately, you need to create private endpoint.
On Destination dataset section, set folder path where you want to drop S3 bucket objects. The remaining fields like compression type and copy behavior, you can keep it blank. Pipeline configuration will take max concurrent connection if you do not set upper limit. Block size can be set from 4-100 MB. Keep default file setting for destination folder.
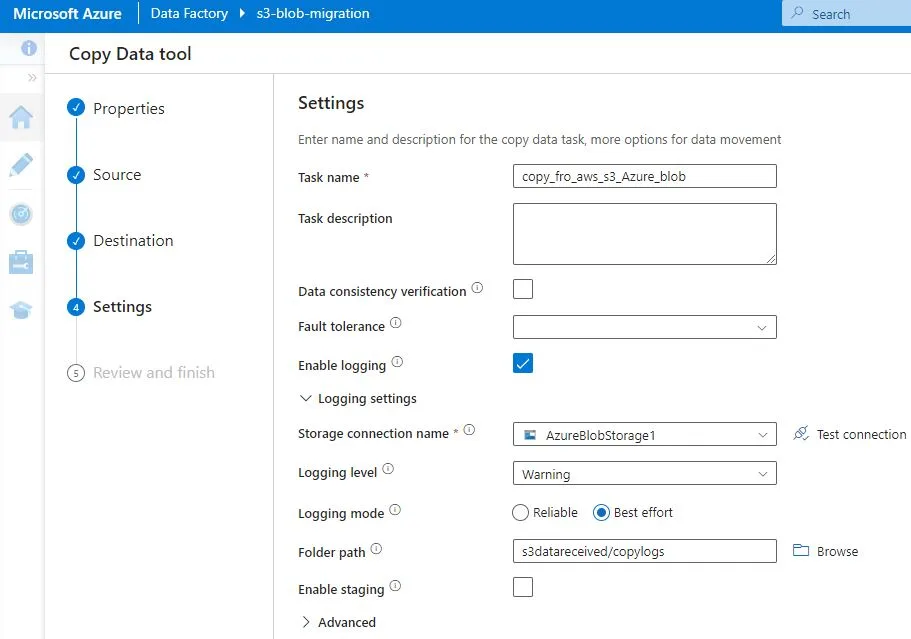
Under setting, give task name. For logging purpose, you can enable logging. In this section, you need to specify the connection and which type of logs you want to store in which folder.
Check summary and click next. Validation will start to create datasets and pipeline. It will provide status of deployment at the end.

3. Data Factory Service Monitoring and Logging
On Data factory screen, go to overview, you will get status of pipeline runs, Activity runs, Integration Runtime CPU and memory, trigger runs. It maintains history of data so you can go backdate. All metrics can be pushed to dashboard. In Data Studio section, you can go to monitor section. It is central location for checking pipeline runs, trigger runs, integration runtimes. You can set metrics and alerts on it.
Your pipeline may fail initially due to source and destination file type selection so choose it correctly. To modify pipeline, source set and data set, you can use author option available at left side. After modifying it, you need to publish it again. To re-run the pipeline, you need to go to monitor section, select and run it. Under Studio dashboard, you can use Author option to modify your pipeline and related setting. If you want to change Data Factory setting, you can use Manage option Available on Studio dashboard.
If you have enabled logging already, you can see warning or informative logs in S3 bucket.
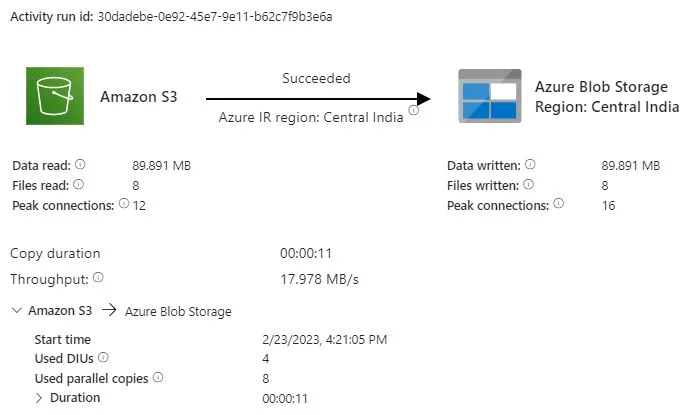
4. Validation
Once Pipeline ran successfully, you can check status by clicking on it. It provides data about how many files read and write. what peak connection was. how much time it took to complete copy job. what throughput was. This data is useful if you plan next files copy job. When you compare source and destination folder, you will see all files are copied successfully.
Cost Consideration
When you are moving out data from S3 bucket, you will be charged for egress traffic. Connection between AWS and Azure can be over internet but data transfer will be slow. Another option will be Site to Site VPN or Direct Connect/Express route. Direct connect/Express route is faster in data transfer than Site to Site VPN but more costly.
For Integration runtime, you have choice to use self-hosted than Azure managed Integration runtime. cost will be reduced. This charges come under data copy. You will be charged for Data Factory Operations (data read/write and monitoring).
Now you have all steps to execute it when there is S3 migration requirement. Thanks for reading. I will come up with new topic in next article. Till then good bye. Keep learning and keep growing with #MultiCloudSagar.