Simplified Route 53 Migration to Azure DNS
During AWS to Azure migration, you also need to migrate DNS records from AWS to Azure. Most of Organization takes public domain, host it on route53 service. Further they create multiple DNS records to support their application, DB and mail server. As it is PaaS based service, provides good performance and resiliency. On other end at Azure, orgnization choose DNS Zone to host public domain and its records.
Common things between these PaaS services are that they provides its own SOA and NS records. You have to configure NS records with your domain registrar to route DNS traffic coming over Internet.
If you have less DNS records, it is easy to create it manually at other domain hosting server. But when such records are in hundreds, manual method may time consuming and more chances of human error. Today I will show you steps on how you can transfer multiple DNS records in public hosted domain, from AWS Route53 service to DNS Zone. Same approach you can take for private hosted domain if needed.

High level Steps :
- Create AWS User Credential
- Download Cli53 tool
- Export AWS Public DNS Records
- Create DNS Zone
- Export Azure DNS Zone Records
- Update DNS Zone File for Migration
- Import the DNS Zone File in Azure DNS Zone
- Validate DNS Zone Records
Pre-requisite :
- Admin access on AWS Account
- Contributor access on Azure Portal
- Registered public domain
- Azure windows VM with public IP
- Pre-installed AWS CLI tool
Migration Steps:
Step 1: Create AWS User Credential
Login into AWS Account, go to IAM, create user with programmatic access. Download access key ID and secrete access key to be used in further steps.
Go back to IAM service console, User -> permission. Click on Add Permission and select Attach Policies. Search for route53 service, select AmazonRoute53FullAccess policy from the list and add that permission to user.
Step 2: Download Cli53 tool
Cli53 is open source tool available on Github. It supports Linux and Windows versions. You can download tools from the below link.
https://github.com/multicloudsagar/documents/tree/main/DNS/Migration%20Tool
Download windows version of tool on Azure VM and store it on C drive.
Step 3: Export AWS Public DNS Records
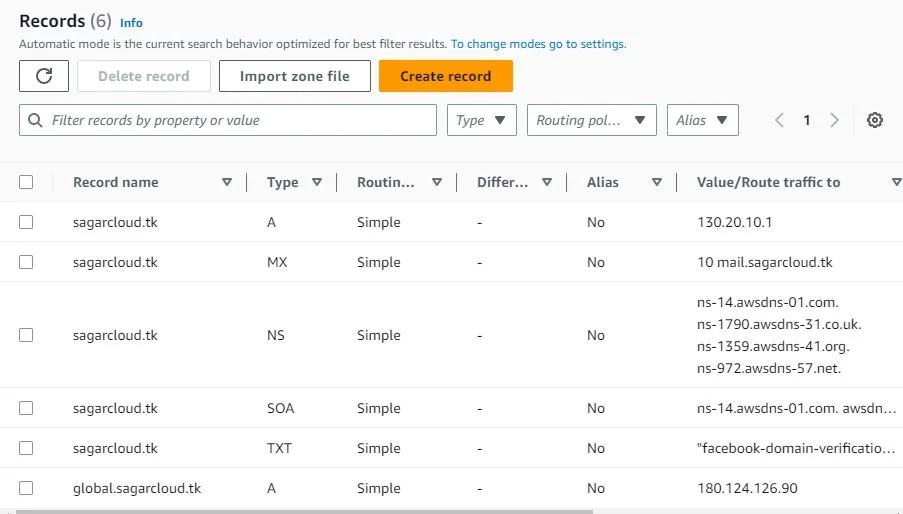
In this demo, we have to export 4 records available in Route53. You can not migrate NS and SOA records from one DNS provider to another as it is no use.

Open Command prompt with administrator privileged on Windows VM. Type below command to set AWS credential to proceed.
C:\DNS> AWS configure
It will prompt for access key id, secrete access key. Provide values which have been taken from step #1 , remaining options you can skip to proceed.
Run command to get hosted-zone-id.
C:\DNS> cli53-windows-386.exe list
Run next command to export DNS records in txt file. Z05619891MFS2HKKZSE6B is unique AWS route53 hosted zone id.
Command Syntax – cli53-windows-386.exe export <hosted-zone-id> > /path/filename.txt
C:\DNS>cli53-windows-386.exe export Z05619891MFS2HKKZSE6B > c:\dns\source_records.txt
Below is record file. We have to note down records except NS and SOA. You can remove those records from the file as we are not migrating it.

Step 4: Create DNS Zone
Login into Azure Portal, search for DNS Zone. Create DNS Zone with same public domain which hosted in AWS Route53. DNS Zone creation steps are simple, you have to select subscription name, resource group and put domain name. Verify SOA and NS records after creation.
Step 5: Export Azure DNS Zone Records
Login into Azure VM, open command prompt with administrator privileged. Connect to Azure portal with below command, it will prompt you to enter azure credential to validate it.
C:\DNS> az login
Run next command to export DNS zone file into text file.
Command Syntax : az network dns zone export -g <Resource Group> -n <DNS Zone Name> -f <TXT file name>
c:\dns> az network dns zone export -g sagar-cdn -n sagarcloud.tk -f target_records.txt

Step 6: Update DNS Zone File for Migration
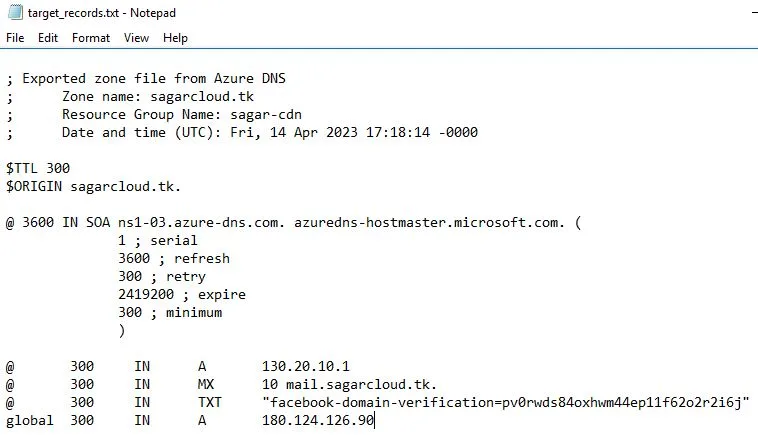
The target_records.txt file is available on the same path where you executed the command. Open it, remove NS records from the file. Copy DNS records from source_records.txt which we had updated in the step #3. Final DNS Zone file is ready for importing.

Step 7: Import the DNS Zone File in Azure DNS Zone
Below command will import SOA , AWS DNS records in Azure DNS Zone.
Command Syntax : az network dns zone import -g <Resource Group> -n <DNS Zone Name> -f <TXT File name>
c:\dns>az network dns zone import -g sagar-cdn -n sagarcloud.tk -f target_records.txt

Step 8: Validate DNS Zone records
Open DNS Zone service, check records. You can go to DNS registrar, update name servers name with Azure DNS Server names listed below.

To delete public hosted zone in Route53 service, delete records inside it and then delete zone.
I hope you understood the steps of migration, it is easy. You can follow the same steps in reverse way to migrate records from DNS Zone to Route53, if needed.
Thanks for reading the article.
Leave a Reply