Building Windows File Server Cluster in Azure
Let’s learn how to set up a Windows file server cluster with a shared disk and storage account as a quorum disk.
Today I am going to share steps about the Windows File server cluster in Azure. It is not very new, but when you are on the Azure cloud, things might change from the configuration side. You can achieve better resiliency and high availability with a shared disk and storage account.
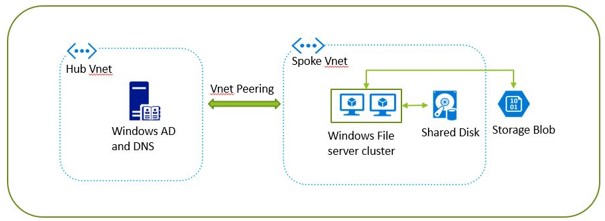
Let’s see how you can achieve it step by step in this Windows fileserver Cluster architecture diagram:
Pre-Requisite:
- Windows Active directory server is up and functional.
- The DNS server is up and functional.
- Create a Storage account with a standard type.
- Administrator permission on Windows server
- Contributor permission on Azure portal
Initial Prep:
- Spin-up two Windows server 2016 nodes.
- Attach NSG to windows servers to allow AD, DNS, SMB and health check traffic from respective servers
- Add nodes in the domain. Verify domain connectivity by login in windows server.
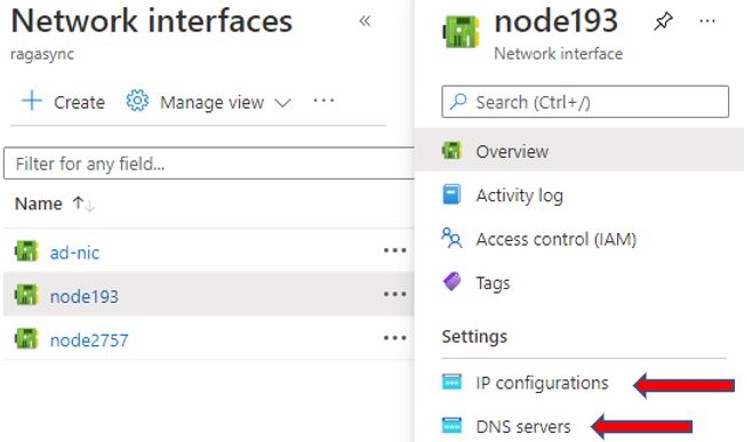
- Make private IP and DNS IP static for both nodes on the Azure portal.
- Login into both windows server nodes and install the file server role and Windows failover cluster through the server manager.
- Create a shared disk and add to both nodes through the Azure portal.
- Open the disk management console in windows, format the disk, and make it online so you can access it.
Note: For a shared disk, you need to go with only a premium disk and a minimum size of 256 GB and supports up to 2 -3 nodes. You can extend the size to 32 TB and node count to 10.

Cluster Setup
- Open Failover cluster manager; create a new cluster, add node 1; give cluster name; click next to complete.
Note: Cluster will fail because it takes the IP of any one node where the cluster manager is running.
- Click on cluster IP and change it to any new IP that is available.
- Add node 2 as you added node 1.
- Start quorum disk addition process; select advance configuration; select cloud witness from the available list; provide a storage account name; and access key available on Storage account blade. This is how your Windows cluster is ready.
Add File Server Role
- Open Failover cluster manager; go to role; create file server role; give a name; select cluster disk.
Note: The file server role will fail initially as it takes the duplicate IP of any one node.
- Once you restart the role, you need to manually change the IP to any next IP from the IP pool.
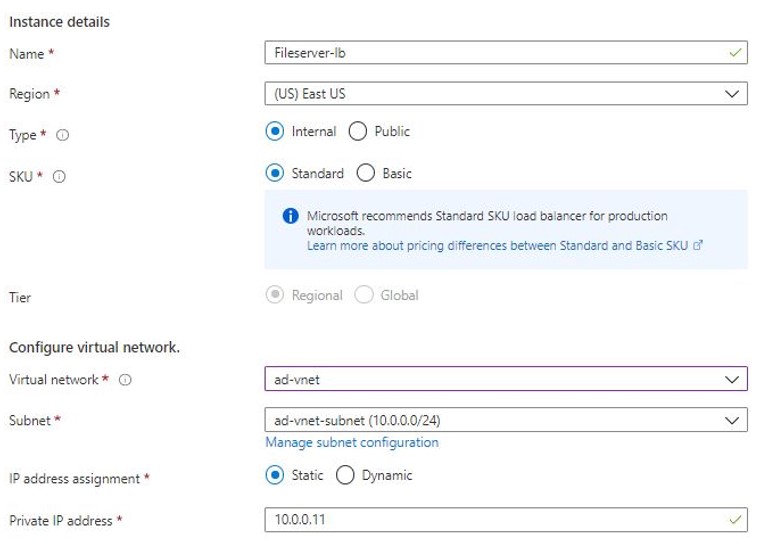
Note: Even though you give a new IP to the role, it is up and running, but still not accessible from outside. Azure says any IP should associate with the Azure NIC card for communication, hence the need to go for the internal load balancer.
- Setup new load balancer:
- Further, you need to add a backend pool to point to both nodes.
- Add a health probe on port 59999 to determine which node is active.
- Configure load balancing rule to receive SMB traffic on port 445.
- Run below PowerShell script to know your Cluster to respond to Azure LB.
# Define variables
$ClusterNetworkName = “”
# the cluster network name (Use Get-ClusterNetwork on Windows Server 2012 of higher to find the name)
$IPResourceName = “”
# the IP Address resource name
$ILBIP = “”
# the IP Address of the Internal Load Balancer (ILB)
Import-Module FailoverClusters
# If you are using Windows Server 2012 or higher:
Get-ClusterResource $IPResourceName | Set-ClusterParameter -Multiple @{Address=$ILBIP;ProbePort=59999;SubnetMask="255.255.255.255";Network=$ClusterNetworkName;EnableDhcp=0}
# If you are using Windows Server 2008 R2 use this:
#cluster res $IPResourceName /priv enabledhcp=0 address=$ILBIP probeport=59999 subnetmask=255.255.255.255- Start and stop file server IP.
Final Testing
- Manually failover cluster from one node to another to confirm everything looks ok; no error logs.
- Create a new file share on the file server role; give a name.
- Browse the new file share path from the client machine.
This is how you can set up a Windows file server failover cluster in Azure with a shared disk and storage account.
Additional points: In Azure, you have the option to put your servers in an availability set to increase uptime or you can use a proximity placement group to achieve low latency.
Leave a Reply