Successful Migration in Azure with Azure Migrate
Migration of on-premise workload to Azure was a challenge. Microsoft has simplified the life of an organization with Azure Migrate.
Today I am going to share my experience on how to do successful migration with the Azure migrate service. It is an Azure native service to migrate on-premise workload to Azure Cloud. This service does not limit here as this can be used to migrate AWS and GCP workload. It is a central hub of tools to start, run, track, and analyze your migration journey to Azure.
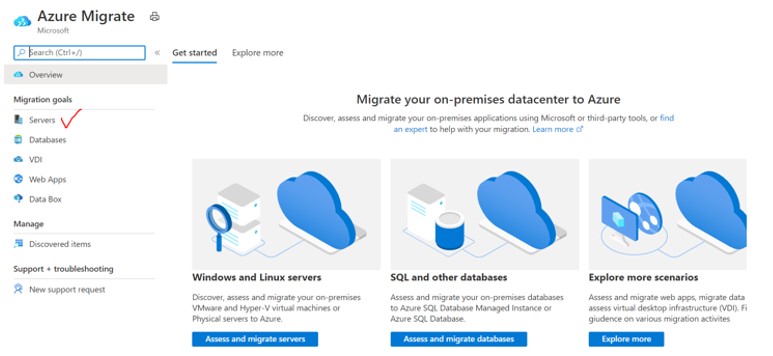
In the migration process, the common customer scenarios are:
- Windows and Linux server (running on Hyper-v, VMware, and physical servers)
- SQL and no-SQL database
- Virtual desktop infrastructure
- Web Apps (.net and PHP)
- Data
Let’s simplify the service. There are three major phases:
1. Before migration – why migration, what to migrate, and when to complete.
2. During migration – landing zone and start migration.
3. After Migration – Governance, and management.
Before Migration
In this phase, you will first decide why you want to migrate your workload. Majorly migration triggers are resource crunch, data center hardware getting expired, business continuity, operation cost, support for fast-growing development, deployment, testing, and delivery of the product to market.
You need to inline your stakeholders and understand their requirements, current challenges and the target date to complete the migration. You can set up kick-off meetings with your stakeholder to understand their current architecture (network, web, app, and DB layer). Data requirement, integration points with other systems, bandwidth and server utilization, load on the system, data backup and retention policy, list of environments, and security policies.
Management has to decide on a skillful team to migrate or need a help from cloud migration partner. Let’s assume you have decided to move with Azure migrate for the on-premise workload.
It is always better to have a migration tracker to keep track of each and every activity with the planned and actual dates. This phase is very important to get clarity on challenges and roadblocks moving ahead.
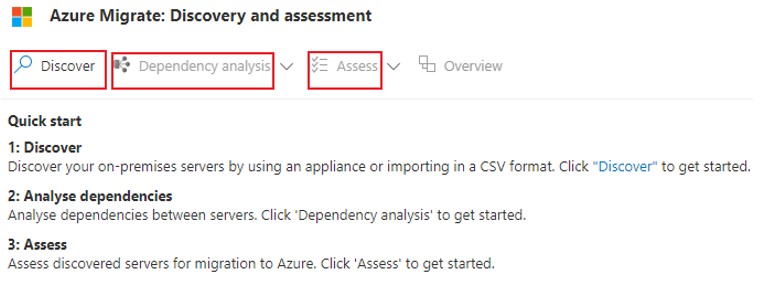
Note: You can use the “Strategic Migration Assessment and Readiness Tool” as well. Considering the above, you do discovery and assessment.
Pre-requisite to Start Discovery
Source Environment (On-prem or other clouds)
- local or domain user account with administrative privileges on VM where the migrate appliance is to be installed.
- Deploy an Azure migrate appliance (config + process server) – it coordinates communications and manages data replication between on-premise and Azure. Note: 1. The minimum configuration is Windows Server 2016, with 32 GB of memory, 8 vCPUs, and around 80 GB of disk storage 2. need to decide on the agent-based or agent-less approach.
- Port opening – 443 (communication between VM and Config server), 9443 (VM data replication to process server ), 3389 (RDP to appliance server), 44368 (browse Appliance URL )
- Config server needs access to specific Microsoft URLs for authentication, management, etc. Note: you can allow it through a proxy if public IP assignment is not possible.
Target Environment (Azure cloud)
- Owner access on the Azure portal.
- Resource group and Virtual network/subnet to host VMS after failover.
- Create an Azure migrate project with the required region and set connectivity (public/private).
- Storage Account for caching.
Below is the diagram depicting the migration flow:
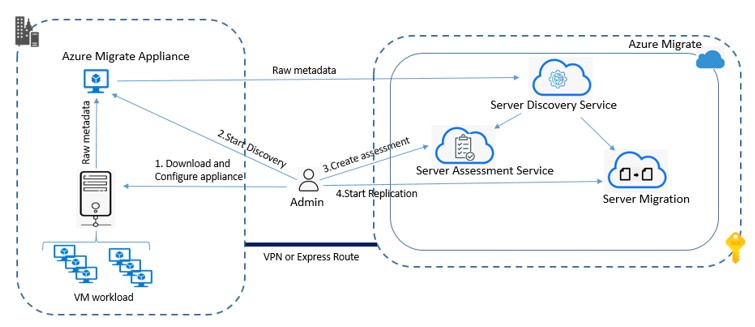
You complete appliance installation in the discovery phase, registration with Azure migrate service, and discover on-premise resources.
The next step is to check dependency analysis. You have two options, for agentless, it polls TCP server data by using API and for agent-based, you can use a service map solution.
It helps to gather data from the server every five minutes. It shows connections between servers, processes, inbound and outbound connection latency, and ports across any TCP-connected architecture
You need to create an assessment, it can be two ways, based on-premise server size or performance data. By default reserved instance is selected for VM for an assessment creation, choose the option wisely. Discovered VMs will automatically appear for assessing the step of the server. You will see the below type of data in the assessment. This data gives you the clarity to run a workload in azure. Points regarding VM size and cost.

During Migration
You can not directly start with Azure migration. If your plan to use the azure migrates service for multiple subscriptions, first decide on the landing zone preparation. You follow the cloud adoption framework for better planning. It includes networking, identity, management, security, and governance. Take a brief look at it.
Networking – Plan to hub-spoke architecture, and how IP addresses will be allocated to each environment for DMZ and non-DMZ. Is WAF enabled for public traffic? how is public IP assigned? how external and internal traffic will be handled? is DNS hosting required? LB configuration? NAT gateway in the private subnet? NSG configuration? service endpoint or private link for PaaS service? Express route or VPN for hybrid connectivity? firewall placement? Network performance via Network watcher.
Identity – How internal and external users are going to access environments, what type of AD license will be allocated to them how the system and user-managed identity configure? how is app registration to use? what types of roles and groups will be configured? SSO integration? MFA enabled? PIM requirement?
Management – How monitoring of service will take place? how performance baseline will be measured, and what approach to take for service availability? Prod and DR ? way to automate operation work. log analytics.
Security – How to apply and store keys and certificates? SIEM deployment? how to apply compliance standards via the security center? how to implement data protection management? considering security at each layer, perimeter, server, data, application, and user.
Governance– Design management group hierarchy. Applying a policy to the correct level (subscription, resource group, resource ).
With landing zone setup, you can start replication, test migration and final cutover stage as provided by my Azure Migrate below:
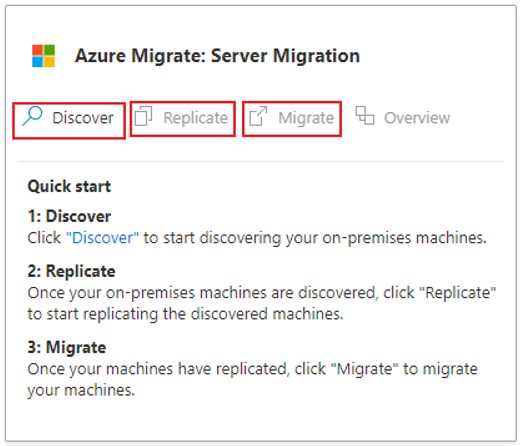
In the discovery step, you download the Azure Site recovery provider and registration key to register with the project. The EXE setup installs the Azure site recovery provider and azure recovery service agent in the host machine. Registration is successful, you can start replicating VM from on-premise.
In the replication step, you need to mention the source, assessed VMS, target network setting, and other remaining settings that can be a default.
Note: Migrating Windows VM, you can take hybrid benefit (on-premise Windows license can be used in Azure VM).
The replication job finishes, and you see the replication VM status as protected and healthy. It means your VM is ready to migrate. you can click on migrate to start migration in the actual Virtual network.
There is one more option given by Azure to do test migration, it is similar to actual migration and clean-up resources after testing is complete.

After Migration
This stage helps to stabilize the migration. keep workload running for a month. Do resource monitoring, alerting, getting utilization reports, and checking security posture. test backup and set monthly targets.
Keep working with Stakeholders to get enough confidence in the Azure cloud. As a best practice, we never touch the production workload. We always take a lower environment for migration and do end-to-end testing. The user gets onboarded in the development environment of Azure cloud and works without any issue, you can think to move SIT/replica in the next phase.
If you follow the above steps, you will do a successful migration.