AWS and GCP VMs Migration to Azure with Azure Migrate in 4 Simple Steps
Hi All, Thanks for reading and providing comments on Azure Migrate service blog earlier. Those who have not gone through the blog yet. Here is link https://multicloudsagar.com/azure-migrate. The content written in the article will help you to understand core concept of Azure migrate service before moving with current article. This article is extension of previous article because we will learn how to perform steps in actual migration.
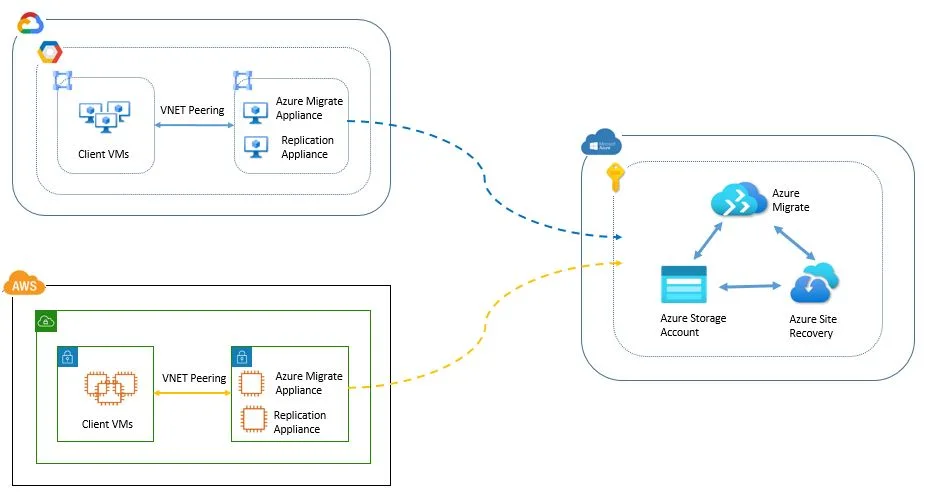
Today I will cover AWS and GCP VMs migration to Azure Cloud with help of Azure Migrate. Being both are public clouds, we will perform steps which we follow for on-premise Servers as defined by Microsoft Azure. Find below architecture diagram to understand the flow.
High Level Steps :
- Create Azure Migrate project
- Discovery and assessment
- Resource Migration
- Failover
Installation steps
Pre-requisite:
- Azure Subscription with contributor permission
- Administrator permission on Windows and Linux VM
- Enable Remote WinRM for Windows
- Enable password authentication for Linux
- Inbound and outbound port opening
- (For Appliance Server – Inbound: 3389, 44368 and Outbound : 443)
- (For AWS/GCP client VM – Inbound: 5985 for windows and 22 for Linux)
- Windows server 2016 or later OS running VM for discovery and assessment
- Windows server 2016 or later OS running VM for migration
- Azure Storage account for caching
- Whitelist Microsoft URLs on proxy or firewall
*.portal.azure.com,*.windows.net,*.msftauth.net,*.msauth.net, *.microsoft.com,*.microsoftonline.com,*.microsoftonline-p.com, management.azure.com,*.services.visualstudio.com, *.vault.azure.net,aka.ms/*,download.microsoft.com/download,*.servicebus.windows.net, *.discoverysrv.windowsazure.com,*.migration.windowsazure.com, *.live.com,*.office.com
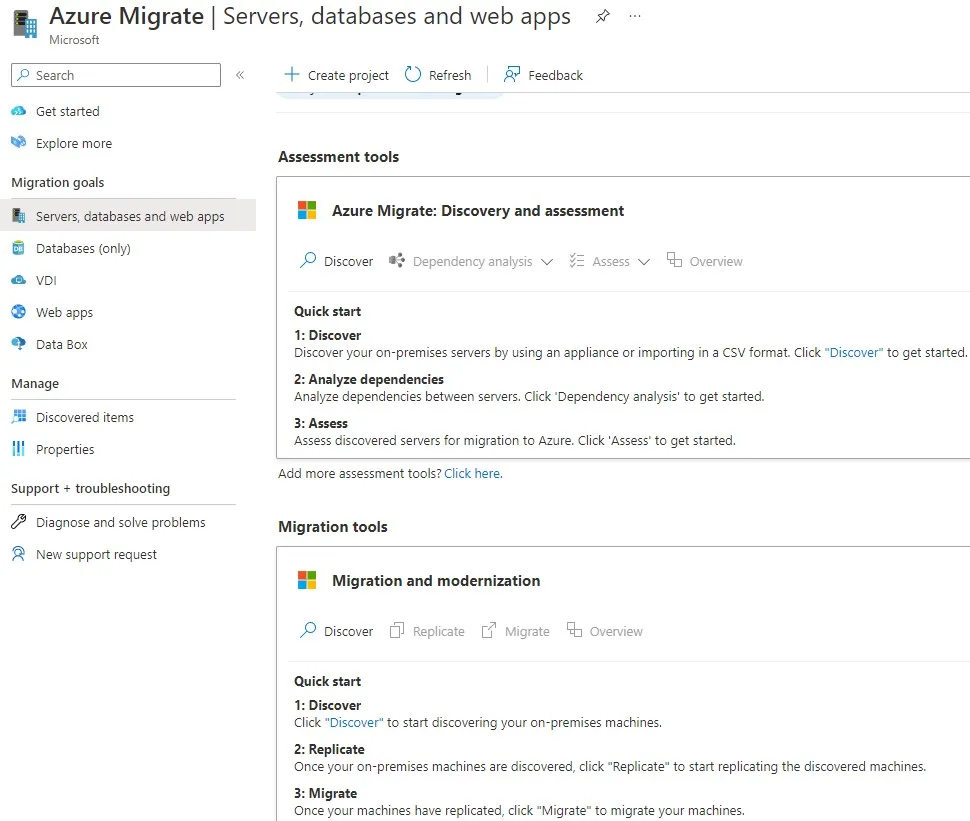
1. Create Azure Migration Project
While creating a project, you have to specify active subscription, resource group, name and region. If you expand advanced option, you will get option to use public endpoint or private endpoint. Default option is Public. To go with private endpoint, you need to setup hybrid connectivity either with Site to Site VPN or Express route. Please note that you can switch between public and private once selected initially. You will see Azure Migrate Dashboard like below after successful creation.
2. Discovery and Assessment
2.1 Discovery
- Before starting make sure you have created windows server instance in network of AWS or GCP cloud. This VM will be used to run Azure Migrate appliance. Default website will be exposed on port 44368.
- Open azure migrate project from Azure portal, generate project key with name. It is needed during the configuration of the Azure Migrate appliance.
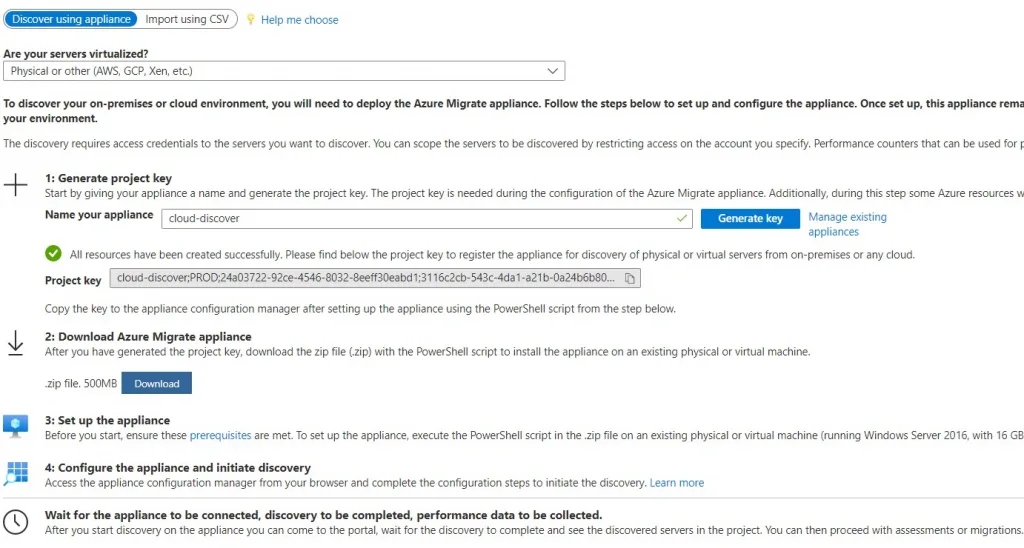
- Download Azure Migrate appliance in windows machine created above. Copy it into c:\azure-migrate created folder. Open the PowerShell and map the path where installation script is exist. Execute the command as shown below. /> .\AzureMigrateInstaller.ps1
- While executing, you need to provide few inputs like type of private/public cloud as source, azure cloud as target , endpoint public or private. After installation, Azure Migrate Application configuration manager short-cut will be available on desktop. Open it from your browser and complete the configuration steps to initiate the discovery.
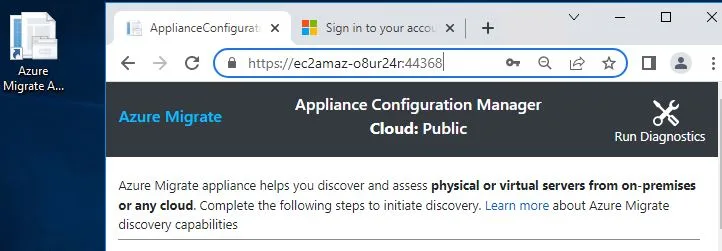
- When you open it, shows pre-requisites to connect azure, check time sync with Azure, check latest updates and register appliance with your Azure portal login.
- You need to add credentials to do server discovery. You can do manually by adding IP address. In case of many VMs discovery, use CSV format to upload server details and discovery.
- Do software inventory with appliance if required. This step is capable to perform the discovery of web apps and SQL Server instances and databases with additional credentials. You will get additional section to pass credentials for software inventory.
- Click on start discovery at bottom of the page.
- Once discovery complete, it will show servers in azure migrate project screen under discovered server.
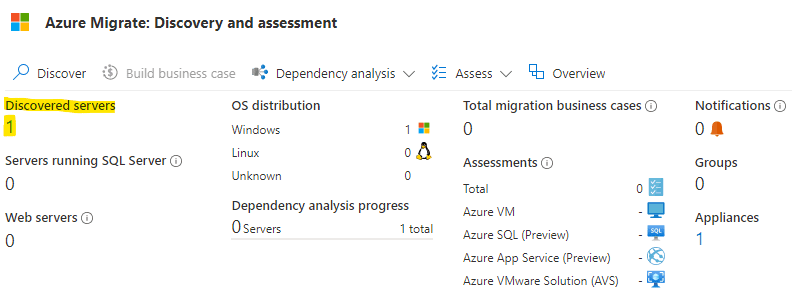
2.2 Assessment
- Open Azure migrate project, click on assess under assessment tool. Click to create new assessment. While filling it, select assessment type is Azure VM. You can edit assessment setting to mention how you want to run VM. For example, on-demand VM running for 22 days and 24 hours with D2 series SKU and hybrid OS license.
- Provide name to assessment, create group and select AWS or GCP discovered servers. Complete the assessment. You can check assessment immediately but it is better to keep it running for a week to get the correct confidence rating.
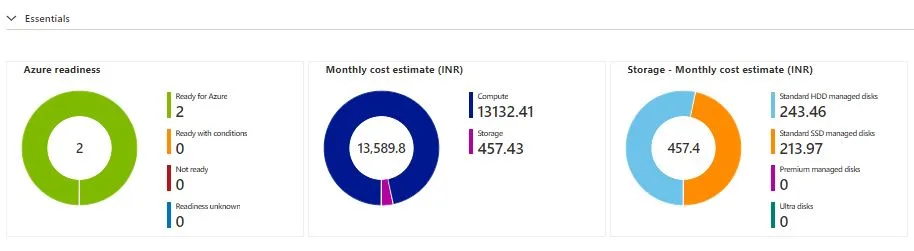
- Assessment will be available under Overview tab under assessment tool section. You can create multiple assessments if you want. Based on it, you can check Azure Readiness, Azure Sizing, Cost estimation and dependency analysis for your future roadmap.
3. Resource Migration
- Before starting make sure you have created windows server instance in network of AWS or GCP cloud from where you will migrate instances. The configuration of the server should be 8 CPU, 16 GB RAM and min 600 GB free space, you can go with less configuration but you will get warning while installation. Internet access to Microsoft URLs (mentioned in pre-requisite) should be allowed on port 443.
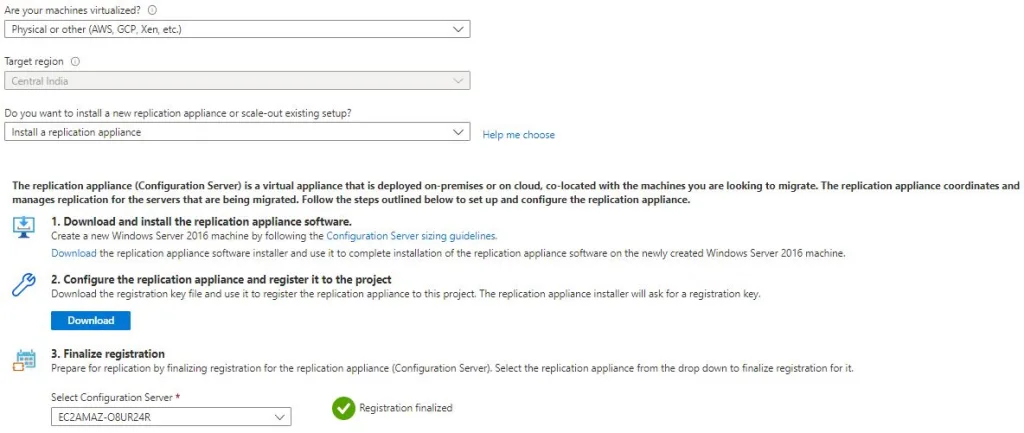
- Go to Azure migrate project, go to discover under migration tool. Select machine type, target region and replication appliance to install. Link will be provided to you on the screen to download replication appliance software (Microsoft Site Recovery Unified setup), download key to application registration on windows 2016 machine. This will be your Azure replication appliance machine for data replication.
- After downloading the software, start installation. Follow steps in sequential order
- Install configuration and process server
- Accept third party license for MySQL community server 5.7.20 installation. This step will check if any existing MySQL version exist, if not , installation begins automatically.
- Provide site recovery registration key
- Set internet setting , with proxy or without proxy
- Make sure all prerequisite should met. Warning message can handle later
- Set password for MySQL root and MySQL DB (svssystems user)
- Set location for installation, make sure you have at least 600 GB or more free space as a recommendation
- Select network interface for connectivity with on-premise machines
- Select network interface for connectivity with Azure components for failback
- Specify the port 9443 for replication traffic. you need one more port to be opened, i.e. 443 by web server for orchestrates replication operation
- Check summary and click on next , it will start installation
- It contains 10 tasks to execute in sequential order. If any one task fails in between, execution will halt. Installation takes 15-20 min based on VM performance
- It will ask you to copy passphrase to you clipboard. Save it. You will need for mobility agent installation in client machine which you are going to replicate
- You will notice a cspsconfigtool shortcut that is created on the desktop of the appliance. Open it and add user/service credential who has access on client machine, under manage account tab
- Under Vault registration tab, browse the vault credential file and click on Register. This will take a few minutes to register
- Go back to portal, open azure migrate project, open discover tab under migration tools from where you downloaded replication appliance software and registration key. Over there it will ask to finalize registration by provide configuration server details. The value of configuration server is auto-populated if you have done installation correctly. Click on finalize registration. You will get registration finalized message in green color.
3.1 Install Mobility agent
Login to replication appliance system, copy agent from the path C:\Program Files (x86)\Microsoft Azure Site Recovery\home\svsystems\pushinstallsvc\repository to windows Client VM. For Linux, you need to copy specific tarball file supporting OS from above server path and paste to Linux Client VM. Steps for both have provided below.
For Windows VM:
- Login with admin credential
- Make sure port 5985 to allow remote WMI call. Run the below PowerShell command to enable it. After running command , you have to type Y to enable it. Same changes can be done via registry or GPO. /> winrm quickconfig
- Open mobility agent, it will verify pre-requisite, binaries, post install configuration and start the service.
- Enter configuration server IP, passphrase and port number
For Linux VM:
- Login with root credential. If not allowed initially, open the sshd_config file in /etc/ssh path. Locate PermitRootLogin line, and change the value to Yes.
- Open the sshd_config file in /etc/ssh path. Locate PasswordAuthentication line and make changes to Yes.
- Locate path where tarball is kept , Extract tar file with command #tar -xvf <Installer tarball>
- Run the agent script #sudo ./install -r MS –q
- Register the agent #/usr/local/ASR/Vx/bin/UnifiedAgentConfigurator.sh -i <configuration server IP address> -P <Passphrase>
3.2 Enable replication on Azure Migrate :
You have built your configuration server and also registered it with the vault, now let’s start with the replication process.
- Select replicate tab under migration tool, select resources you want to migrate. Select on-premise appliance, process server and guest credential which you set up while configuring the configuration server. Virtual machine tab on next page will detect the discovered servers.
- In Target settings, select the subscription and target region. Specify the resource group in which the Azure VMs reside after migration along with VNET and Subnet.
- For Test migration section on the same page, you can select same VNET and Subnet as well. In Compute setting, select azure VM size and OS disk. Additional Disk section is there to replicate other attached disk as well. Review and start replication tab, review the settings, and
- click Replicate to start the initial replication for the servers. Replication policy is set by default under Azure Recovery Vault for crash and app consistent data.
3.3 Validation :
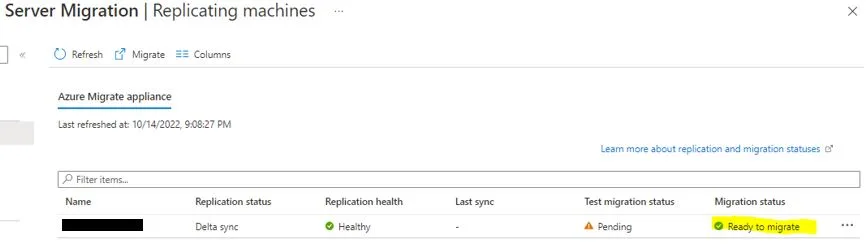
- Go back to migration tools section under azure migrate project, you will notice replication and server under it. Click on Overview to see the status of the replication.
- When the Start Replication job finishes successfully, the machines begin their initial replication to Azure. It takes approx. 4-5 hours based data size and bandwidth. You can use Azure migrate free of cost for first 31 days. After that there will be charge as per replicated VM stored in Azure Recovery vault.
4. Failover
4.1 Test Failover (Test Migration):
Running a test migration is always advisable as it checks whether migration will work or not. During this migration AWS/GCP source machines will not be impacted and continue replicating the data. It also creates VM with replicated data. You can login and check if everything is working fine or not. At this step, you have time to address any issue before actual migration.
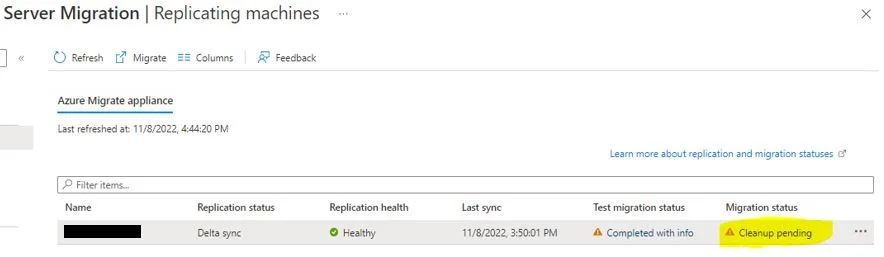
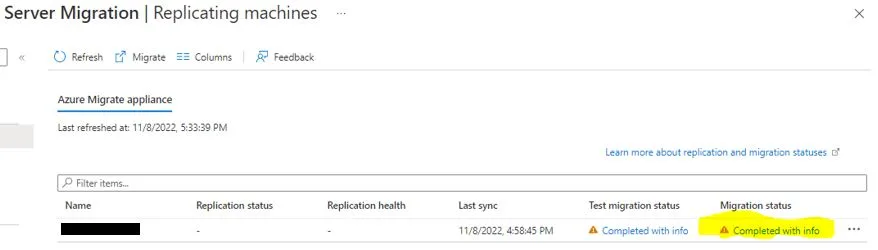
Right-click the VM to test, and click Test migrate. In Test migration, select the non-production VNet in which the Azure VM will be located during testing. Choose the subnet to which you would like to associate each of the Network Interface Cards (NICs) of the migrated VM. After the migration finishes, view the migrated Azure VM in Virtual Machine service dashboard in the Azure portal. The machine name has a suffix –Test. After the test is done, right-click the Azure VM in Replicating machines, and click Clean up test migration if it has done as per expectation and no issue has detected.
4.2 Actual Failover (Actual Migration) :
Go back to replicate screen, right-click the VM and click migrate. By default Azure Migrate shuts down the AWS/GCP VM, and runs an on-demand replication to synchronize any VM changes that occurred last time. This step ensures zero data loss. If you don’t want to shut down the VM, select No.
After Post migration :
Once AWS/GCP VM successfully migrated to Azure Cloud, your job is not fully done. Now you need to check migrated VMs from Management and Governance perspective. Below steps can consider
- Apply Azure policies to meet industry compliance and regulation
- Enable Microsoft Defender for cloud
- Start taking backup with disk snapshots or azure backup service
- Install Azure Monitor agents for continues logging, monitoring and alerting
- Enable Diagnostic logging on VMs for troubleshooting
- Enable Azure Sentinel for SIEM ( Security Information and Event Management)
- Review NSG (Network Security Group) applied on Subnet and NIC level, correct it if not according to security guidelines
- Check Azure Advisor to get recommendation for cost saving, performance and security.
- Enable update management or WSUS or SCCM for patch management
- Secure Identity on VMs with windows AD, PIM and MFA.
This is how you can migrate AWS/GCP VM successfully and support it post migration to gain confidence of your stakeholders for long run. I hope this article has increased your cloud migration knowledge. Best wishes for cloud migration journey.